Continued from page 1
Marking Up Your Documents
If a user just wishes to have their PDF drawing documents with them on their iPad in the field for viewing (rather than carrying around large rolls of drawings for instance) they can use a number of other excellent applications, including Bluebeam’s own Bluebeam Vu. For those who want more–including a lot more–Revu has plenty to offer.
Advertisement
As we said in our feature article, (see: Architosh, “Ultimate iPad Guide: 12 Must-Have Apps for Architects,” 20 April 2013) one of the core tasks of architects (and engineers) is to provide construction observation services and verifying conformance to the construction documents. This tasks always requires that the design and engineering professional brings documents in the field with them…and usually for markup if necessary. Now with iPads AEC professionals are doing this markup work on their favorite tablet device.
This is really the heart and soul of Bluebeam Revu for iPad. For starters the user can open more than one PDF file at a time because the app features a tabbed interface. For example, open the floor plan, the sections and the structural framing plan by the engineer to verify beam and column connections. (see image 06)

06 – With Revu you can open multiple documents at once. The tabbed interface allows you to quickly go between PDFs.
Bluebeam Revu for iPad’s markup tools are truly extensive. You access them from the upper right menu by clicking on a markup icon. An icon-based tool palette pops up on the right. This palette includes icons for text, notes, highlighter, lines, clouds, callouts and more to redline your PDF files. You can also customize your markups by changing property settings for each tool, including color, fill, opacity, line type and weight and font choice. (see images 07 -08)
Let’s Talk Markup
Upon opening Revu and scanning its markup choices one is initially a bit overwhelmed. There often are more than a few ways of achieving the same or similar thing. This area of the program took some time to gain interface fluency. Each markup tool has its own way of working. In truth, the user does need to review the instructional manual on learning how to use these markup tools to their fullest potential. Trial and error will only take you 90 percent there, if that.
When you markup drawings in Revu for iPad you must confirm the items you add. You do this by clicking on the green check box on the upper left. Or if you don’t like the markup you just did you can undo it and try again. Revu supports multiple undo and as you work you may prefer to keep adding items and then confirm all these markups at once by selecting the green checkbox upper left. The red X button will cancel these marks and not save them.

09 – A confirmation check box is what you hit to confirm your markups. Revu features multiple undo but once you confirm a change hitting the green check box you must reselect it and hit the delete X button to make that mark go away.
Likewise, you can alternatively individually highlight items and use the red X button from the toolbar at right to delete marks you no longer want. If you want to edit an item, even after you have saved it to the markup information, you can select it. Little handles appear and you can then move the object around, including rotating it by various degrees. (see image 10 above). If you choose to delete the mark you can use the red X button on the toolbar. Once you are done with your markups you can confirm by selecting the green check upper left.
Along with the standard compliment of markup tools on the right, which include things like yellow sticky notes, clouds, arrows and lines and callouts, there is another toolbox of tools on the left. This is called the Tool Chest and this is where you can save custom edits to your tools, as well as where there are dozens of specific icons that can be placed on drawings to signify exact things.
These Tool Chest tools include custom versions of your standard tools, plus Comment & Review, Sequences, Punchkey Symbols and Proofreading Symbols. (see image 10) One thing that you can do is import custom tool sets from Revu for Windows to Revu for iPad, allowing one to take into the field the same customized tools you use back in the office.
Another feature that shouldn’t be missed out on is the ability to take photos with your iPad camera and attach them to PDF documents. This is invaluable in field inspection work and in particular punch list reporting.
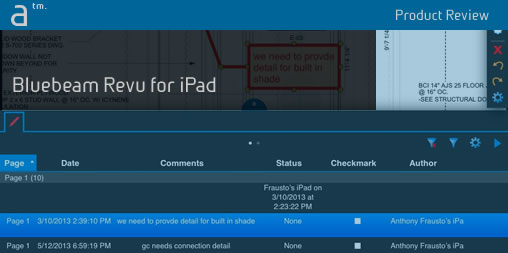
Finally, one of Revu’s best features is its ability to track changes to documents. This becomes really critical even if you are the only one marking up a document. From the markup list each markup is time and date stamped and in collaboration sessions each particupant is recorded here as well. This roots your markups into meeting and site visit contexts where you otherwise also have records of decisions. If you select a markup item from the markup list it takes you directly to that spot on the PDF. If you select mark on the PDF it highlights that item on in the markup list. (see the title graphic bottom edge and image 05).
Next page: Collaboration


Reader Comments
Comments for this story are closed