|
| 1 |
2 | 3 |
Doors and Windows
Once you have your walls accurately in place,
you can create a Floor and Ceiling (solid modeling forms)
with a single click of the menu. Next you add doors and windows
using predefined objects from the Libraries palette.
Microspot Interiors 3.6 ships with over 1000 objects ranging
from doors and windows to furniture and accessories. The
program also supports the popular 3D Studio Max (3DS file)
format which means you can bring into your designs an unlimited
variety of prebuilt 3D objects, from furniture from name-brand
companies to Volvo stationwagons.
The program is very intelligent about placing
doors and windows. One chooses a door, for example, from
the Library palette, and drags it to the model space until
it touches the wall you want the door to be in. Let go and
the door is magically inserted into the wall with perfect
3d healing between door object and wall. You can adjust the
location by simply selecting and dragging the door along
the wall. Or better yet get very accurate by using the Windows
and Doors palette. This palette shows a miniture view of
the door or window object currently selected. From this palette
you can type in dimensions for the doors size, placement
off the floor plane and distance to end of wall from edge
of door on both sides. In the view below (see
image 02) for
example I have positioned the door 6 inches from the corner
of the room (a 6 is typed into the
top right field in the Windows and Doors palette).
|
|
|
02
- Highlighted door, Windows and Doors Palette, Library
Palette
|
If you just want
an opening in a wall (a cased opening without a door) you
can place those too, including ones with arches. Two buttons
on the Windows and Doors palette let you center items automatically
on the walls or reverse the direction of the swing on the
door. With a window chosen similar options are presented.
Viewing your Model
In order to place objects into rooms -- especially
doors and windows -- you need to be able to navigate around
your room in 3D. You do this in Microspot Interiors by using
the NaviCam palette. This palette isn't as intuitive as most
in the application's interface and at first was a source
of frustration. Even after you fully understand how it works,
it can still be unwiedly to use. Better instruction via QuickTime
movies would help accelerate the new user's mastery of this
interesting navigation palette. (see
image 03)
|
|
|
03
- 3D navigation under the floor view - NaviCam lower
right
|
Despite this shortcoming,
and it is minor, there are some really cool things about
navigating in this application. One such feature is that
the floor and ceiling become visible/invisible based on your
viewpoint in 3d. You don't have to turn off the ceiling or
floor object in order to see through them. (see
image 03) This can be very useful when placing furniture
in rooms along wall surfaces or lighting on ceilings.
The
Libraries
Microspot Interiors ships with over 1000 3d
objects organized in various libraries. Everything
from bathroom fixtures, kitchen appliances, stairs, furniture
to lighting and computers is available. Additionally, the
Library is where you will find textures to apply to your
walls, floors and other objects. And if that is not enough,
the company is making more objects available every month
via its website. Finally, Microspot Interiors 3.6 now supports
the popular 3DS file format so you can obtain thousands of
free and "for-purchase" objects such as cars and even people
via
other sources on the Internet.
Exploring Your Interior
Once your interior environment is complete
you can produce computerized flyby movies, complete with
textures, lights and sophisticated shadows. The program doesn't
support advanced rendering technologies such as Radiosity,
but it produces fairly nice raytraced results. Additionally,
you can easily create many different types of rendered animations
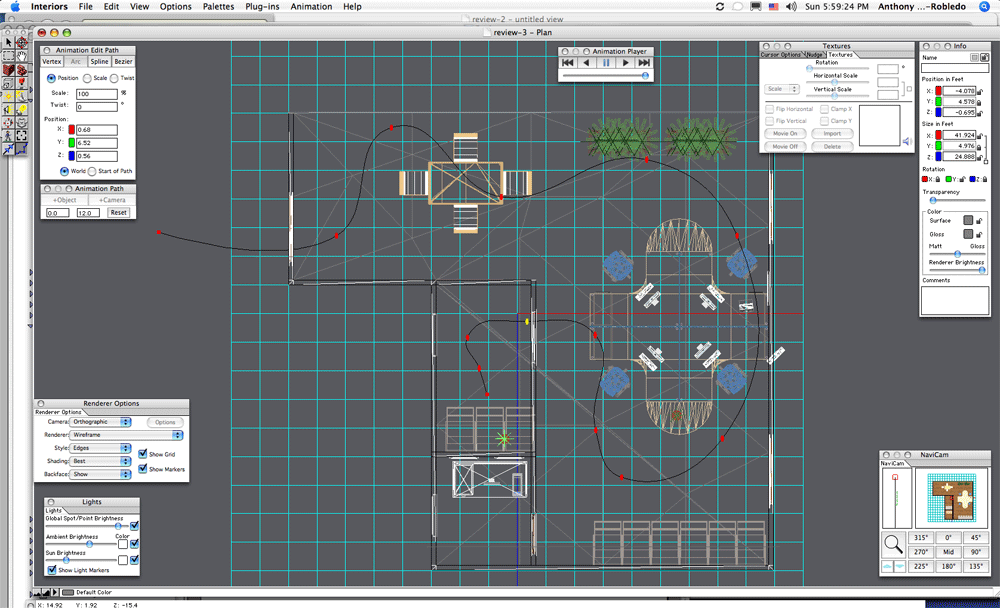
with the flexibility of the Animation Path tool. With this
tool you establish a path for the camera to follow. You can
see the path defined in my office environment below. (see
image 04) You can draw it as a polygon and then convert
it to
a bezier curve and adjust individual vertices to smooth
out the path.
|
|
|
04
- Animation Path Selected
|
You have several
options in how you use this path. You can have the camera
stay literally on the path and constantly aim in a particular
direction, or you can have it stay on the path and aim at
a fixed point (say the center of a room). Or you can simply
rotate objects or rooms around and animate that view.
next
page > | 1 | 2 |
3 |
|