
What is Enscape
ENSCAPE FOR MAC SKETCHUP IS THE FIRST VERSION of the popular Enscape rendering application that runs natively on Mac computers. The German software interactive rendering tool has been mentioned and written about many times at Architosh, but this is our first product review.
In our typical style, when we write the first review of an application, we make part of the review instructive and introductory. And we share our experiences learning and getting familiar with the application ourselves as part of our review process.
Enscape for Mac for SketchUp runs as a plugin for Mac SketchUp users. Enscape is always a plugin—not a standalone render app—and currently, there are versions of Enscape for Archicad, Revit, Rhino, SketchUp, and Vectorworks. All of these, except SketchUp, are Windows-only versions at the moment.
Enscape Basics
Installing the Enscape plugin for SketchUp for Mac is quite straightforward. Once installed, you will find an Enscape tools palette and an Enscape menu under the Extensions menu in SketchUp. (see images 01 – 2)
UX Topics
The user experience of Enscape for SketchUp is thus: model like normal in SketchUp. To launch Enscape, click on the Start Enscape button at the top of the Enscape toolbar. This action launches the separate Enscape rendering viewport window. Next, move the window to the side of your SketchUp window so you can see both simultaneously. (Image 01)
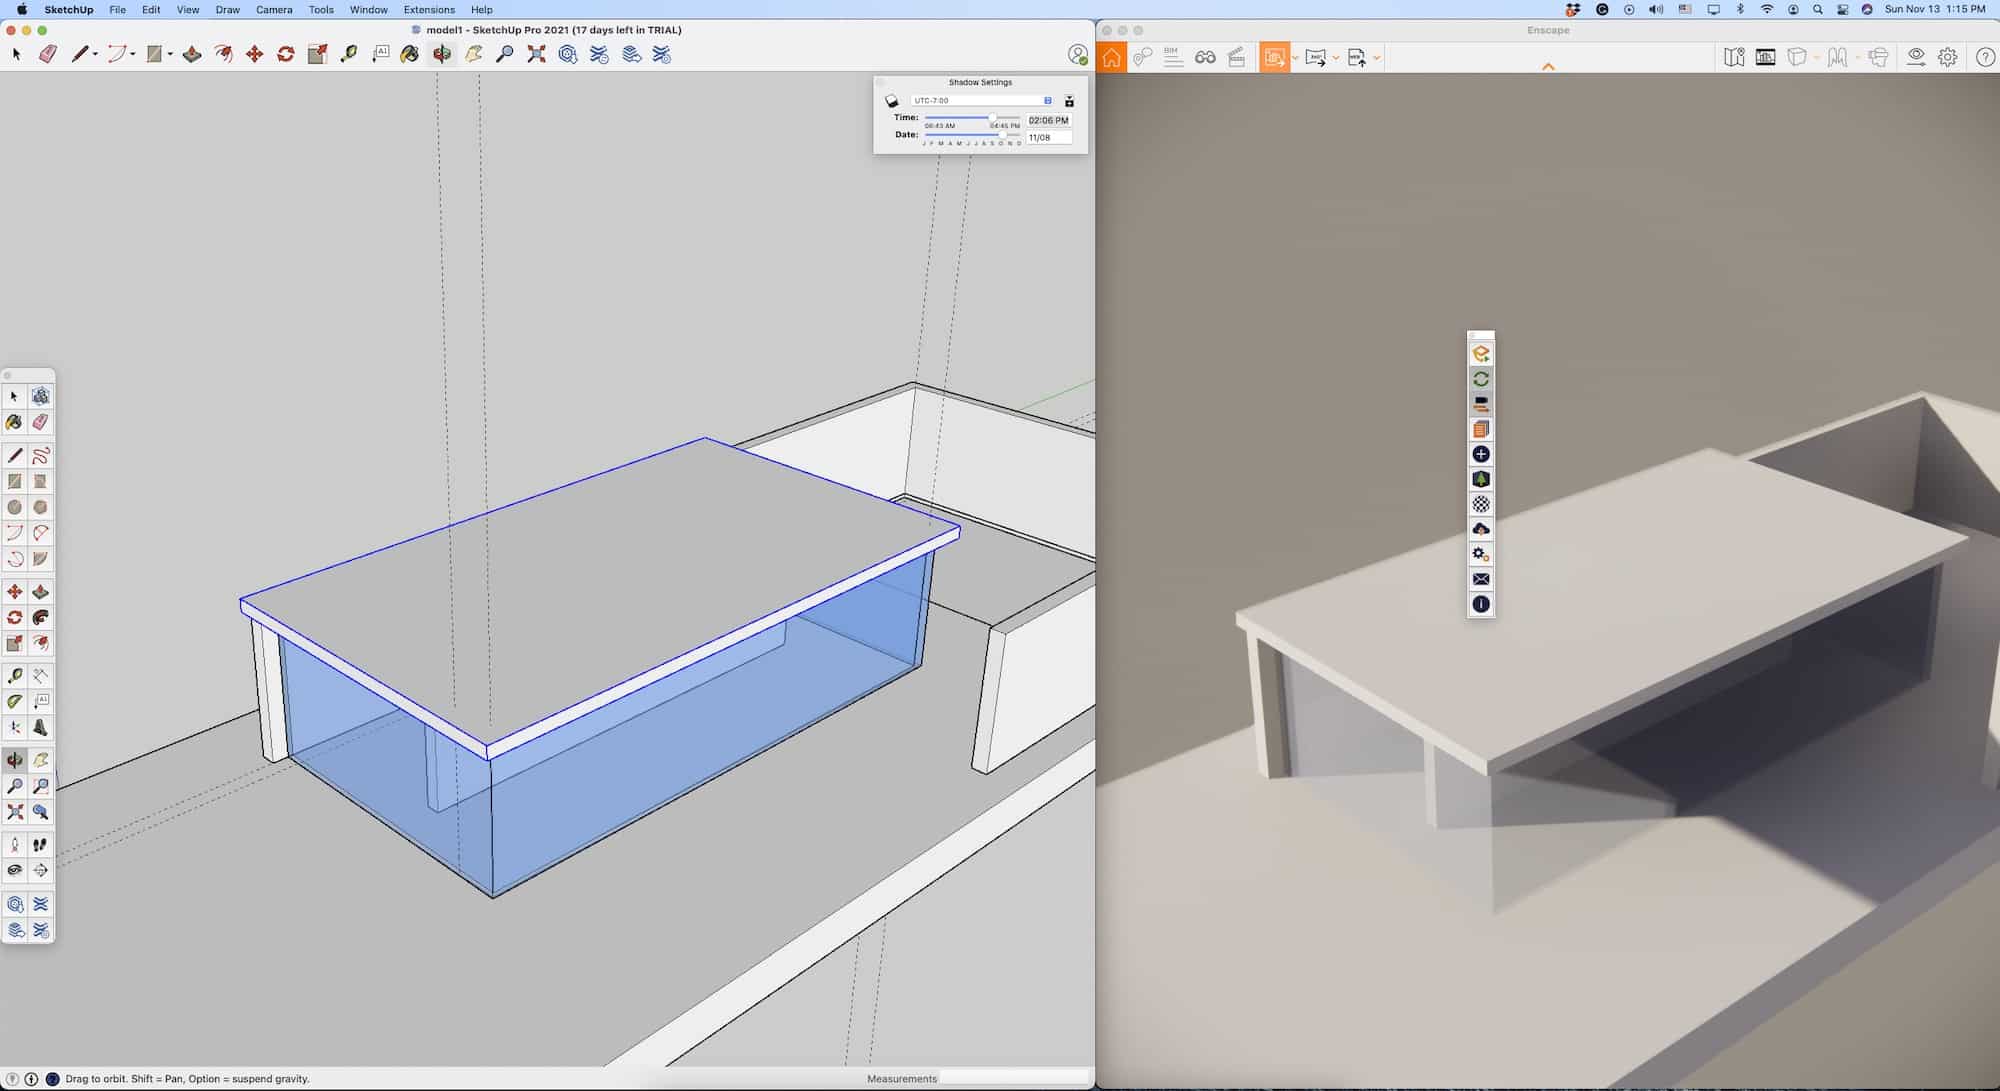
Image 01 — Enscape for Mac SketchUp. SketchUp on the left and the Enscape window on the right. The Enscape toolbar is floating over the Enscape window. An Enscape menu is under the Extensions menu item in SketchUp. (click on images to make them larger, typical)
The next button on the Enscape toolbar (2nd one down from the top) is the Live Updates button. Click on this button to enable you to model in SketchUp and see those changes instantly in the Enscape window. (Image 02)
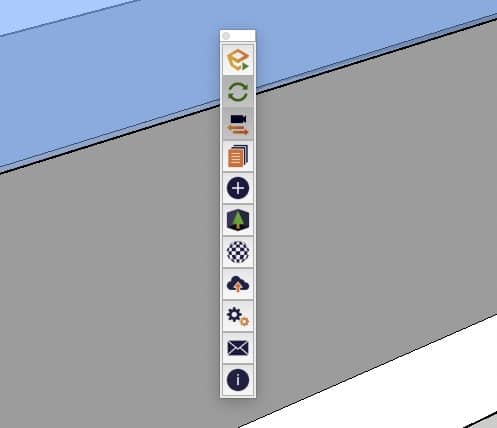
Image 02 — The Enscape toolbar is shown in SketchUp for Mac with Enscape renderer. The SketchUp window must be active for the Enscape menu to show. If you click on the Enscape window for any reason, the Enscape toolbar vanishes. Make SketchUp active again by clicking on it, and the Enscape toolbar re-appears. The buttons discussed start at the top and work down.
The third button down is the Synchronize function which means all window navigation and view changes in SketchUp get mirrored (reflected) in the Enscape window. (see image 04 and notice that the model is the same orientation in both windows). Note the shaded buttons.
Skip the 4th button. The 5th button looks like a black circle with a plus sign and is for Enscape lights (more below). The 6th button looks like a tree, and this brings up the Asset Library (more on this later). The 7th button looks like a materials editor, a common symbol in rendering tools. We get into this in the next section.
The 8th button is the Uploads Manager, and there you manage panos and web standalone renderings, and we will cover this under the Rendering section below. The final buttons in the toolbar are for app preferences or settings, feedback, and license and version info. (Image 02)
Navigation
Navigating your Enscape rendered model will take some practice, but it is mostly straightforward. The first thing to learn is that synchronization is your friend. In other words, rely on using your developed navigation skills in SketchUp to manipulate the Enscape window’s camera position. Rely on this until you fully master the Enscape navigation tools.
If your model looks different or far away in the Enscape window or has vanished, click once on the Synchronization button (third button from the top, image 02). This snaps the model into the same camera view as SketchUp.

Image 03 — How navigation works in Enscape’s window–synchronization off.
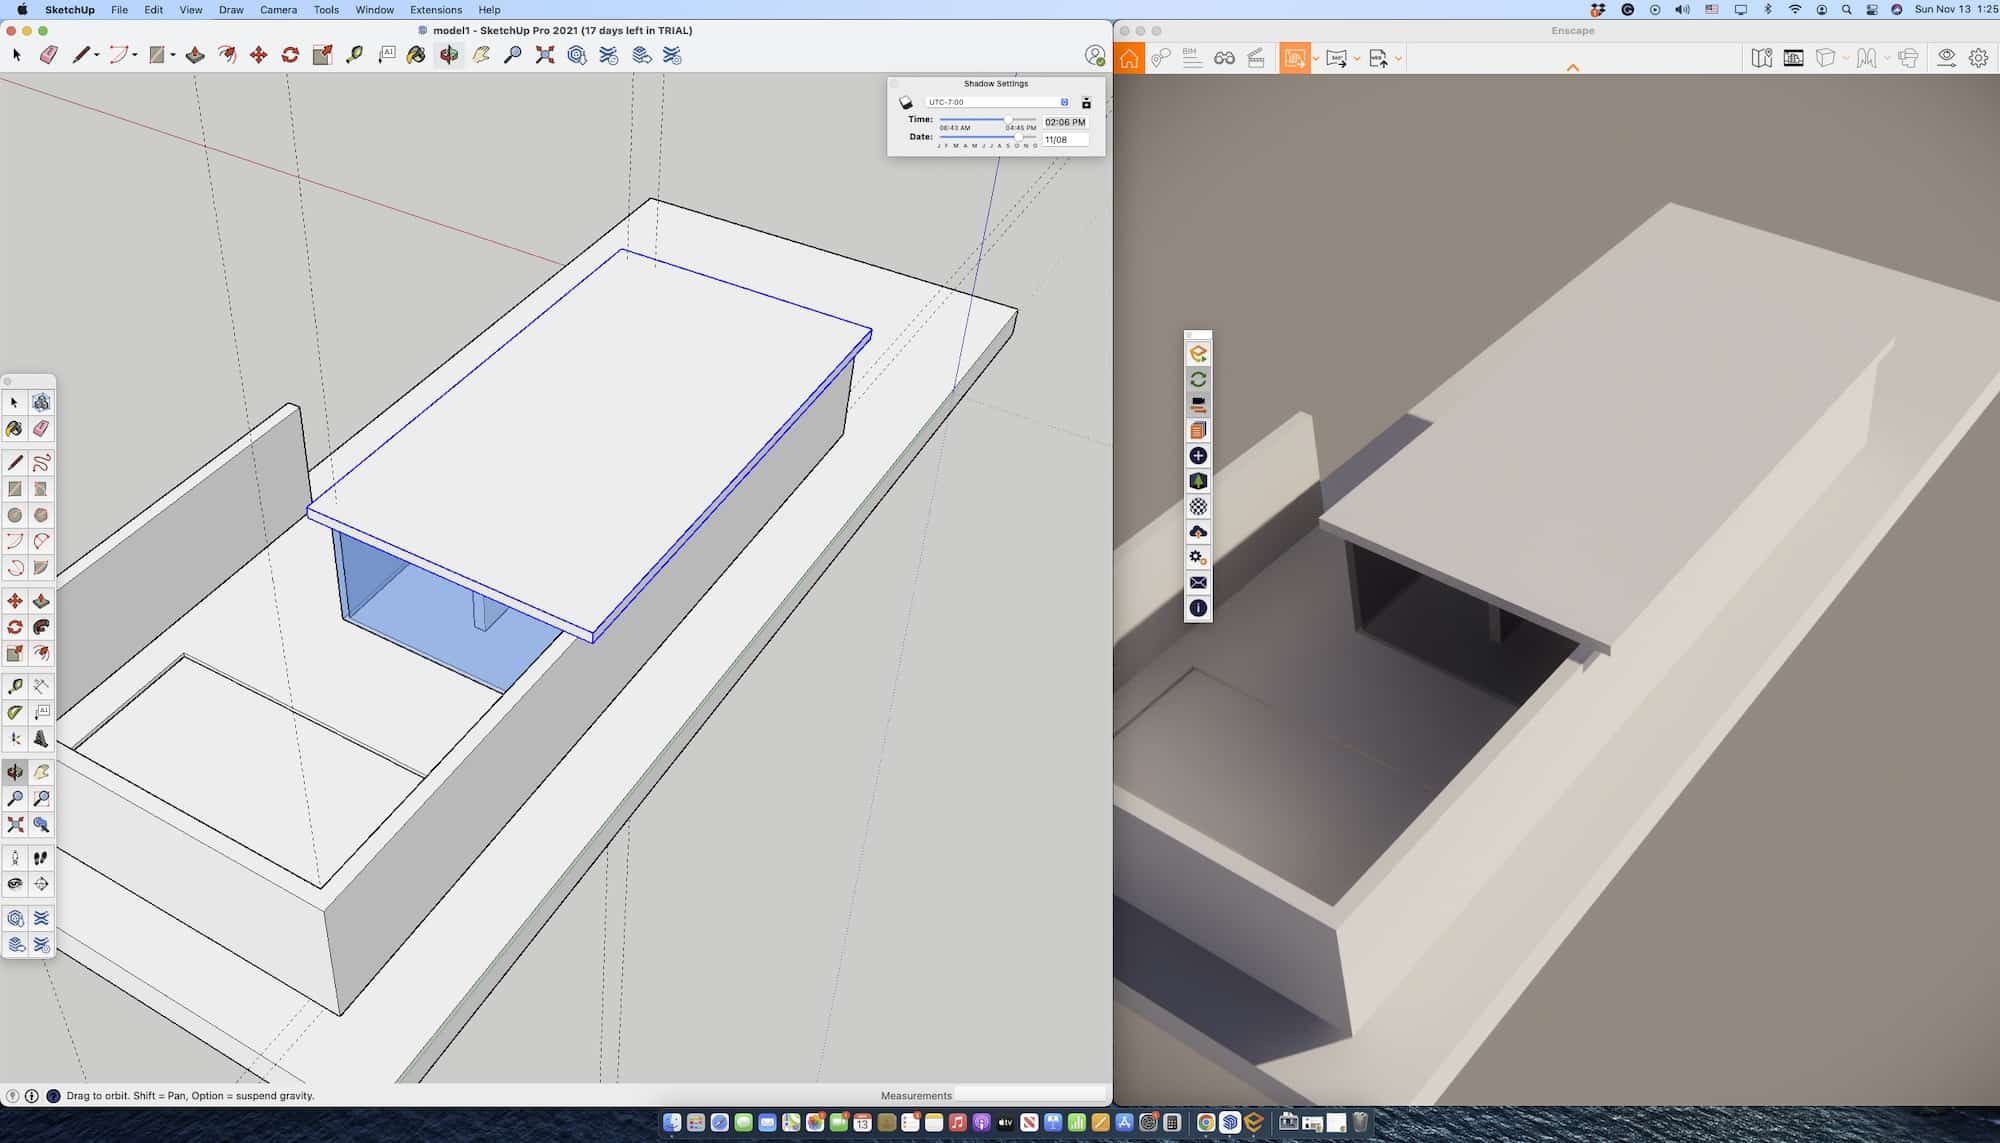
Image 04 — How navigation works in Enscape’s window–synchronization on.
Every time you launch Enscape, a How To Get Started window pops up, providing pointers on navigation, most importantly. Use the keyboard keys A, S, D, and W to move left (A), right (D), forward (W), and back (S). This same navigation works with the arrow keys.
You can speed up these movements in the Settings for Enscape access via the gear icon in the main Enscape window. (See the movie below and image 05.)

Image 05 — Enscape Window Settings.
A left mouse click rotates the object model around the viewport; a right mouse click orbits the viewport camera around the object model. Getting good at using these will quickly position you anywhere in the model in the Enscape window. To change the time of day and hence the sunlight, add the Shift key with a right mouse click and drag right or left to move the time.
In this movie, we can experience Enscape walk-thru / fly-thru animation.
To do a fly-thru or walk-thru experience, you simultaneously use both the navigation keys and the left mouse button. See the movie inline above for an example of the fluidity of navigation possible.
Enscape Window Icons
From the top left, the icons are Home Mode, Collaborative Annotation, BIM Mode, View Management, Video Editor, Screen Shot, Mono Panorama, and Web Standalone. (image 06 below)

Image 06 — The Enscape upper toolbar in the Enscape window.
Working from the opposite direction on the right, Help Pane, Enscape Window Settings, Visual Settings, VR, Navigation Mode, Project Mode, Safe Frame, and Minimap round out the Enscape window top buttons.
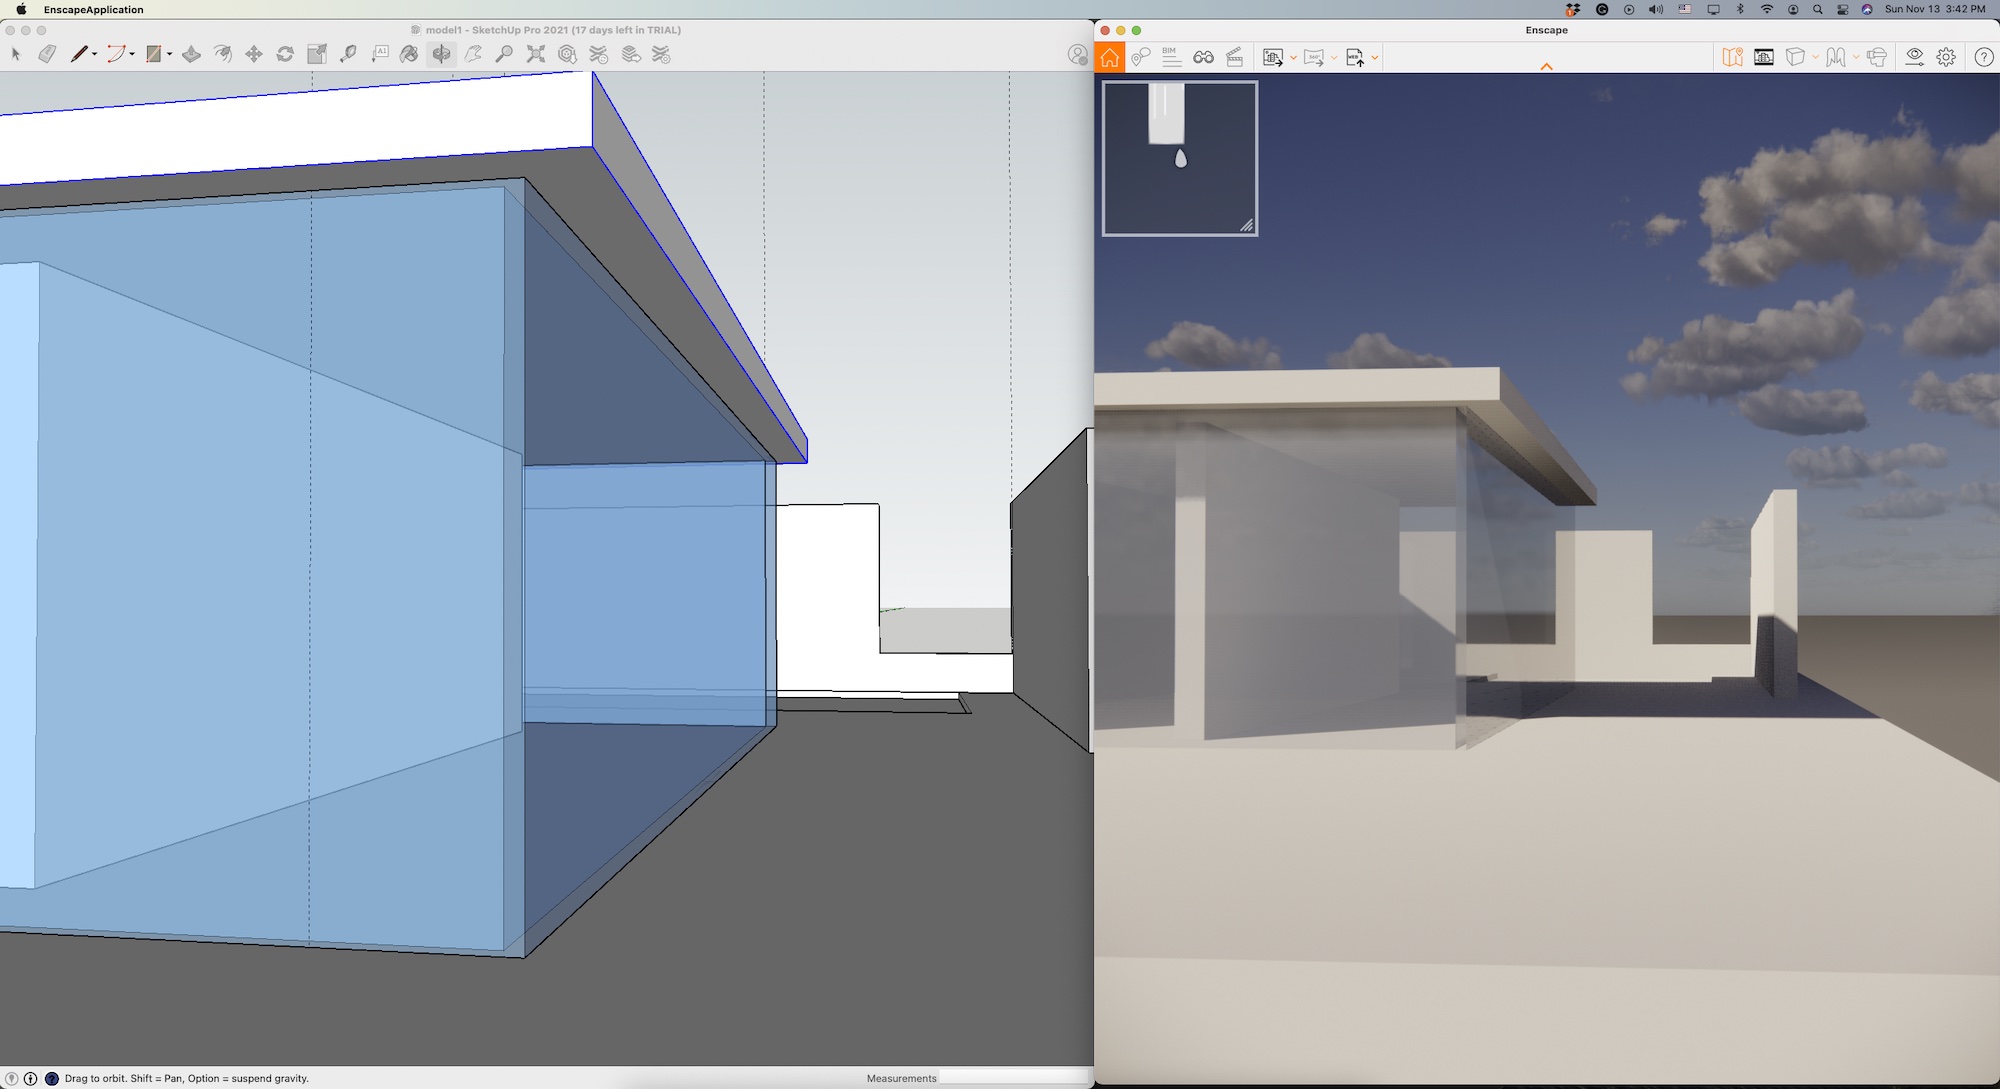
Image 07 — Enscape’s minimap is shown in the upper left corner of the right Enscape window.
We will touch on a few key tools for now. If you create SketchUp Scenes, these automatically sync with Enscape and appear under the View Management icon (left side). You can toggle between SketchUp scenes. This is a handy feature.
Every Enscape window has its own settings; you access them from the gear icon (right side buttons). These control the mouse speed, smoothing, and movement speed. They also determine the default camera height reference.
I will touch on other controls below. This covers the basics, and the SketchUp user is likely anxious to understand how to address materials, lighting, and explore rendering options.
next page: Lighting, Materials and Objects in Enscape for Mac
Lighting
In Enscape, you have your sun and environmental lighting options as part of SketchUp, but you also have two types of artificial lights—a spotlight and a lit rectangle.
In the middle of placing lights, I experienced a crash in SketchUp. Upon reopening the same SketchUp file, the method to get reconnected between SketchUp and Enscape was not so clear. After quitting Enscape and trying to relaunch it via the usual means, as explained above, it still failed.
So the method is to relaunch SketchUp. This also auto-relaunched Enscape. If Enscape is the one to crash, this same method is likely required, but in that case, always make sure to save your SketchUp file before quitting and relaunching SketchUp.
Enscape’s spotlight placement is straightforward once you have watched the Enscape tutorial on it. It is basically a three-step process. Once placed, lighting controls per light give you fine-tuned control of overall scene lighting.
Materials
To work with the Materials in Enscape, one must create colors in SketchUp that get applied to objects as proxies for materials. Then one must have image textures to map as materials to these proxies. The Enscape folks suggest www.ambientcg.com as a source of suitable, accessible materials. There are many other sources, but this one was nice to explore and had some very nice materials.

Image 08 — An ambientcg.com-based material texture used in my review of Enscape for Mac SketchUp.
Enscape advises downloading the 2k-jpg zip resolution file as a good rule of thumb for Enscape. Save the downloaded zip file where you are storing your model project files. Create a project directory for your rendering project with sub-folders for models, assets, guides, and renders. Save the zip file into the assets folder. You can create a sub-folder just for image textures and organize them further if necessary.
When you expand the downloaded image texture, there are multiple files inside. The file ending in the word “color” gets applied to the Albedo input in the Enscape Material Editor. The file ending in “displacement” gets applied to the Height Map input. And the file ending in “roughness” is applied to the Reflections input. (see image 09 below)
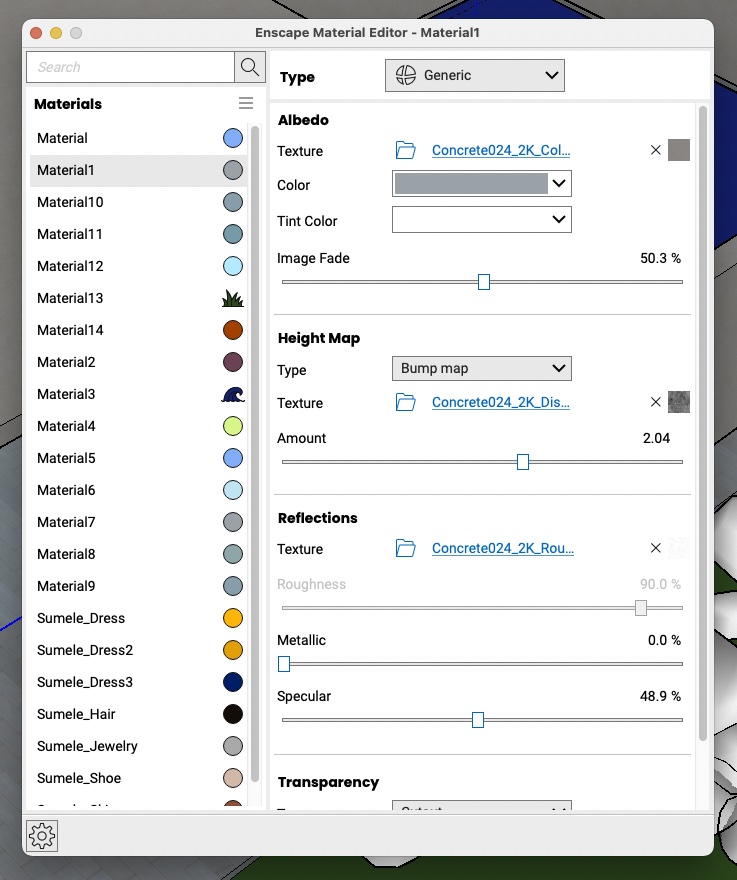
Image 09 — Working with material textures in Enscape is quite straightforward and user-friendly. Three separate files get applied to the Albedo, Height Map, and Reflections input textures, as shown above.
Working with image textures and following this pattern is relatively straightforward. Using the sliders for Height Map and Reflections will give the average user a good amount of control, but there is nothing like getting image textures that are spot on with what you want in your rendering scene. Still, notice how the concrete looks in these two rendering versions with the Height Map at 10 versus a setting of 2. The second image at setting 2 produces a smoother-looking concrete. (you will need to click on the images below and zoom in by clicking again — images 10-11)

Image 10 — How to use the material editing tools to create smoother or rougher materials. Look 1.
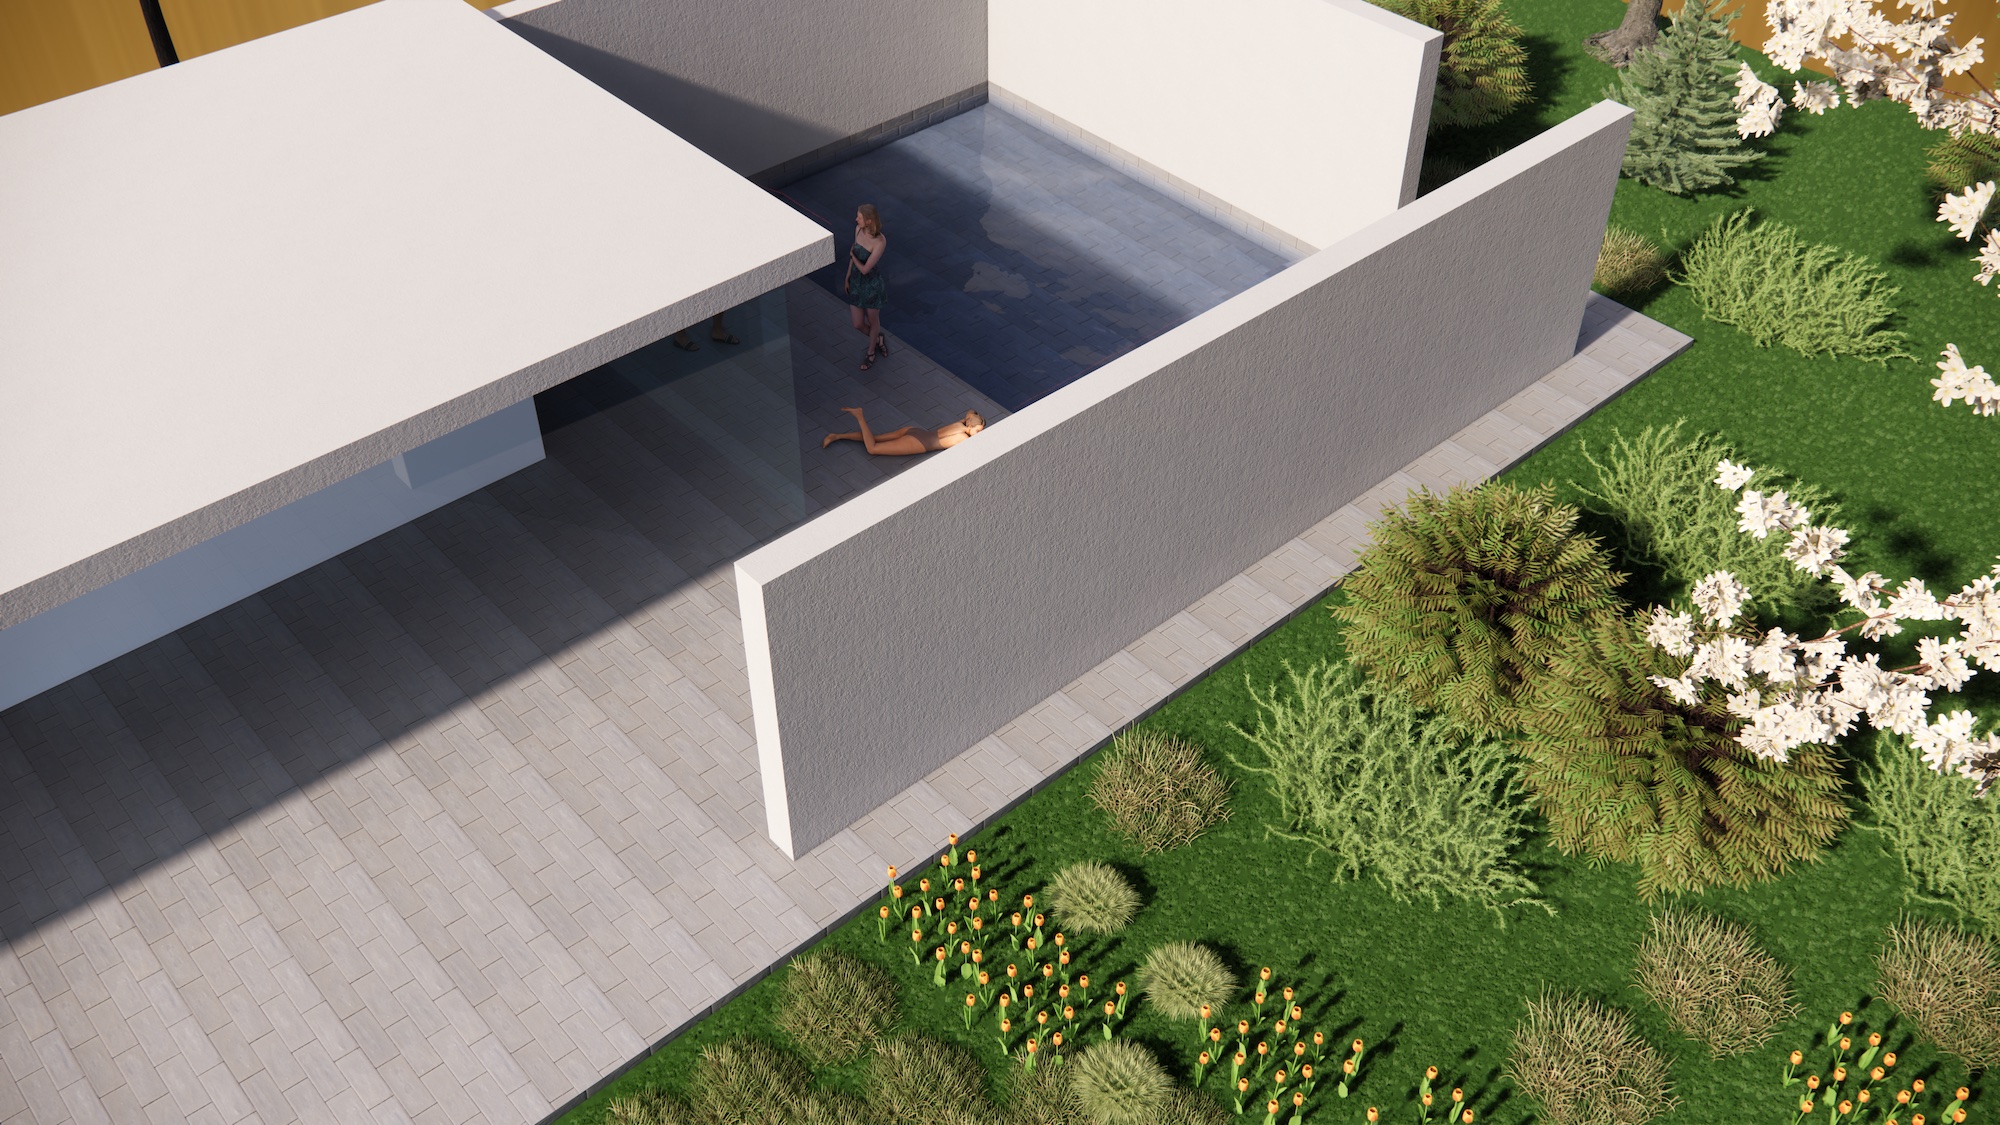
Image 11 — How to use the material editing tools to create smoother or rougher materials. Look 2.
In the setting set at 2, the concrete texture pattern is less pronounced. And there are other effects and adjustments in the lower region of the Material Editor under Transparency.
For instructive diagrammatic effects, the Transparency settings can be used to create semi-translucent materials. (see image 12 below). A low Refractive Index combined with a mid-point Opacity setting yields materials you can see through.
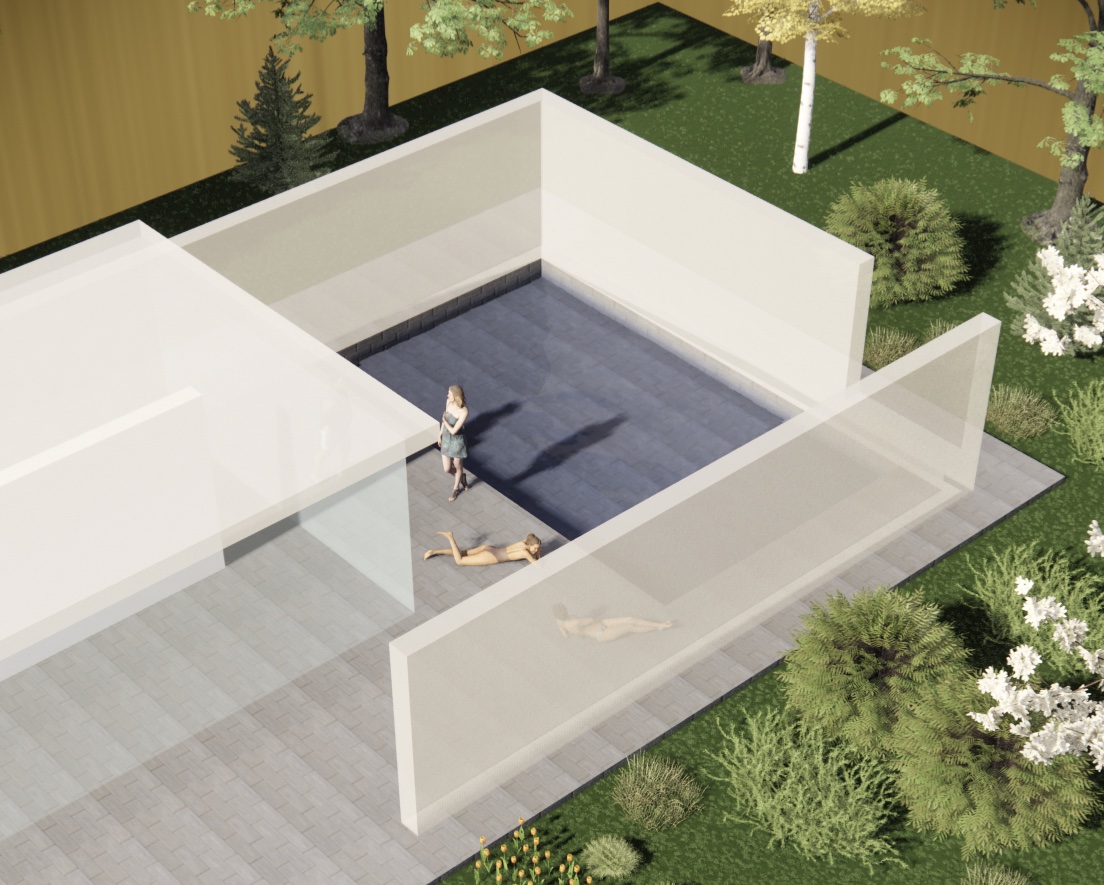
Image 12 — Unique material and transparency effects are easily possible in Enscape and can be useful for creating views of 3D building models where seeing through walls, floors, or roofs can serve some instructive or illustrative purpose.
Grass and water are two types of textures that Enscape makes easy to implement. There are slider controls over Wave Settings, Caustics settings, Water Color, Wind Settings, and more.
Grass is equally simple. The primary settings are Height and Height Variation. Albedo color is simply the color of the grass.
Object Library
Enscape ships with an extensive library of objects for your scene. The vegetation library contains over 651 items and seasonal library items for autumn and spring. Next to vegetation, the Library’s biggest sub-sets are accessories and furniture, with 768 and 569 items, respectively. (image 13)
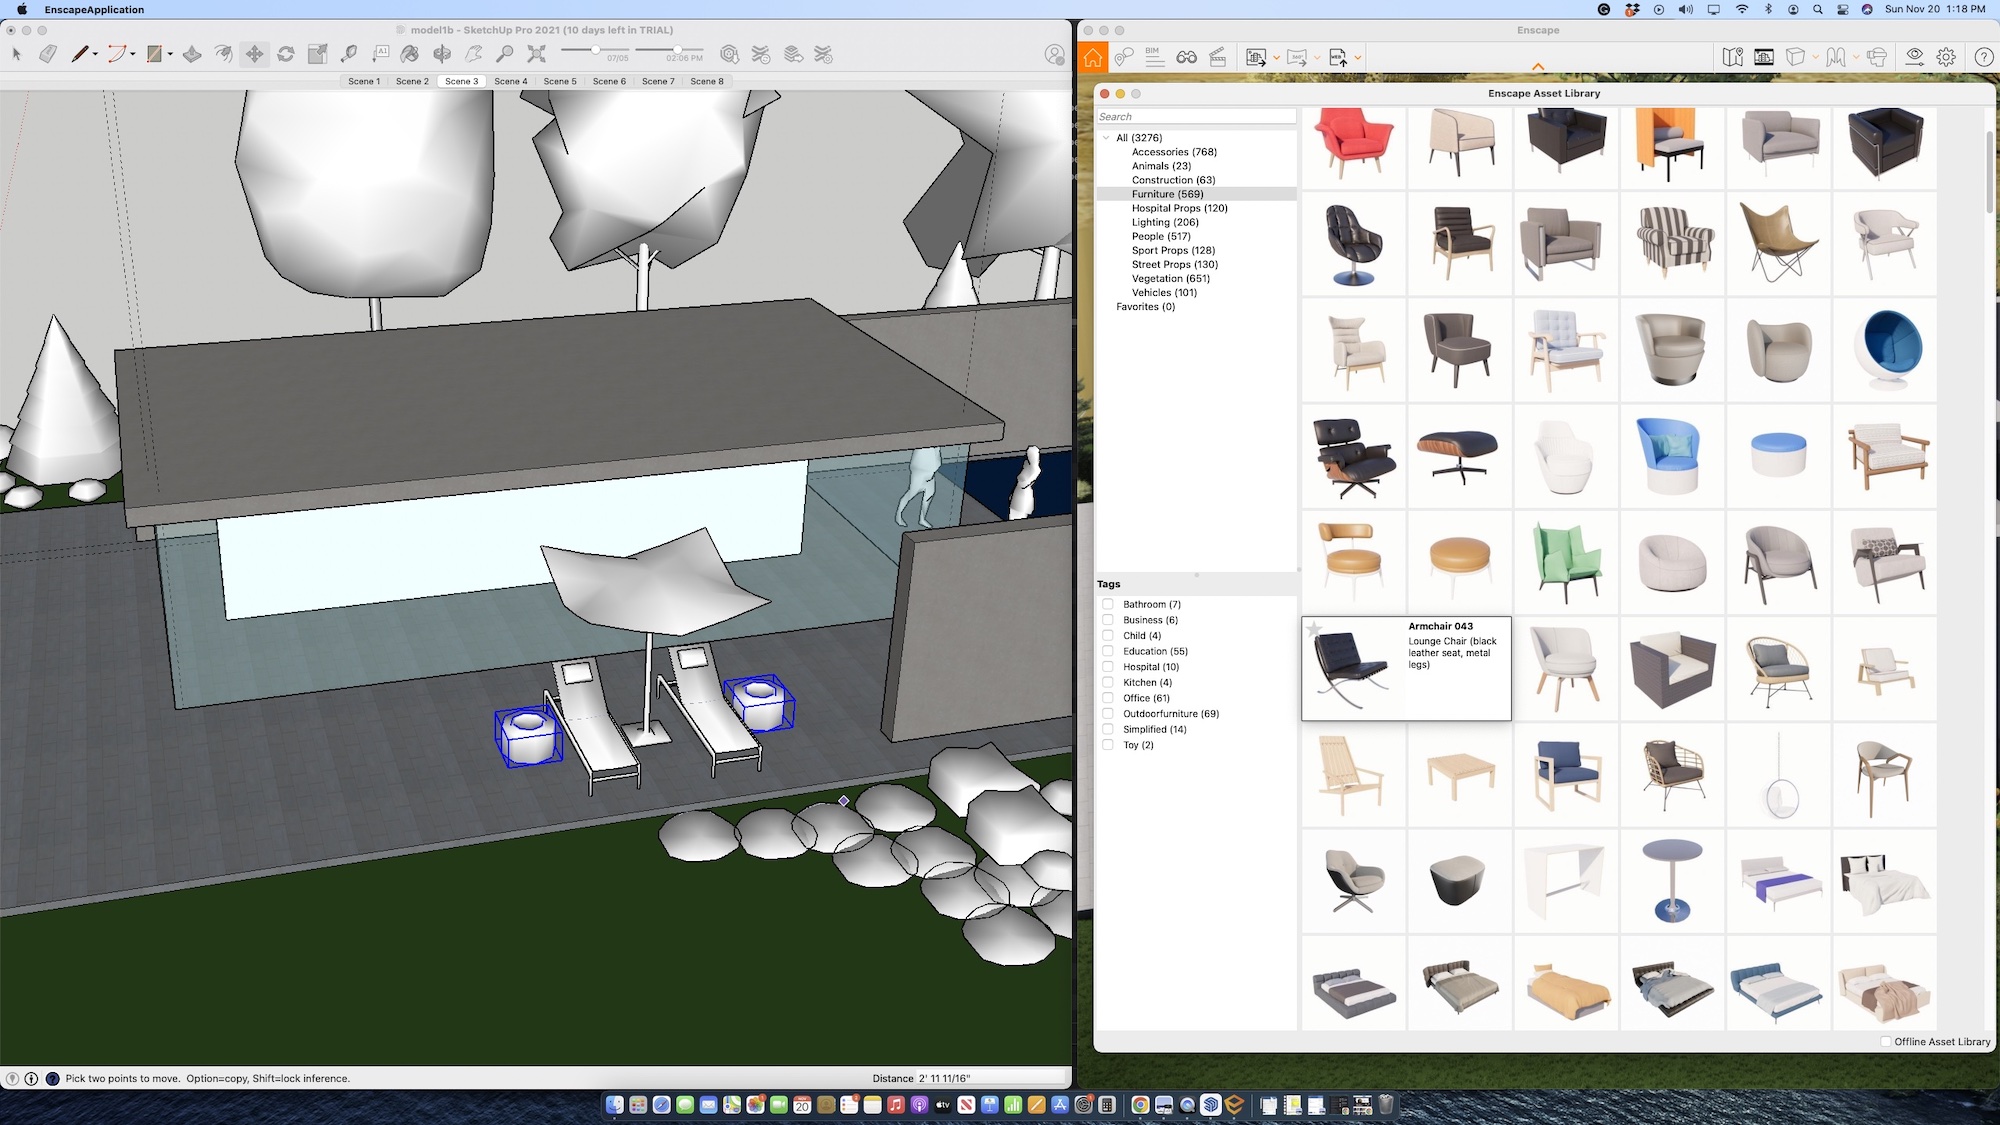
Image 13 — The Enscape Object Library is very complete and has excellent vegetation options.
One selects an object from the Library and then drags it into their SketchUp model. The process is to click and then move the cursor to the SketchUp window. Once inside SketchUp, objects can be duplicated, moved, rotated, and even scaled. For this test model, I moved a lot of trees, bushes, grasses, furniture, and accessory items.
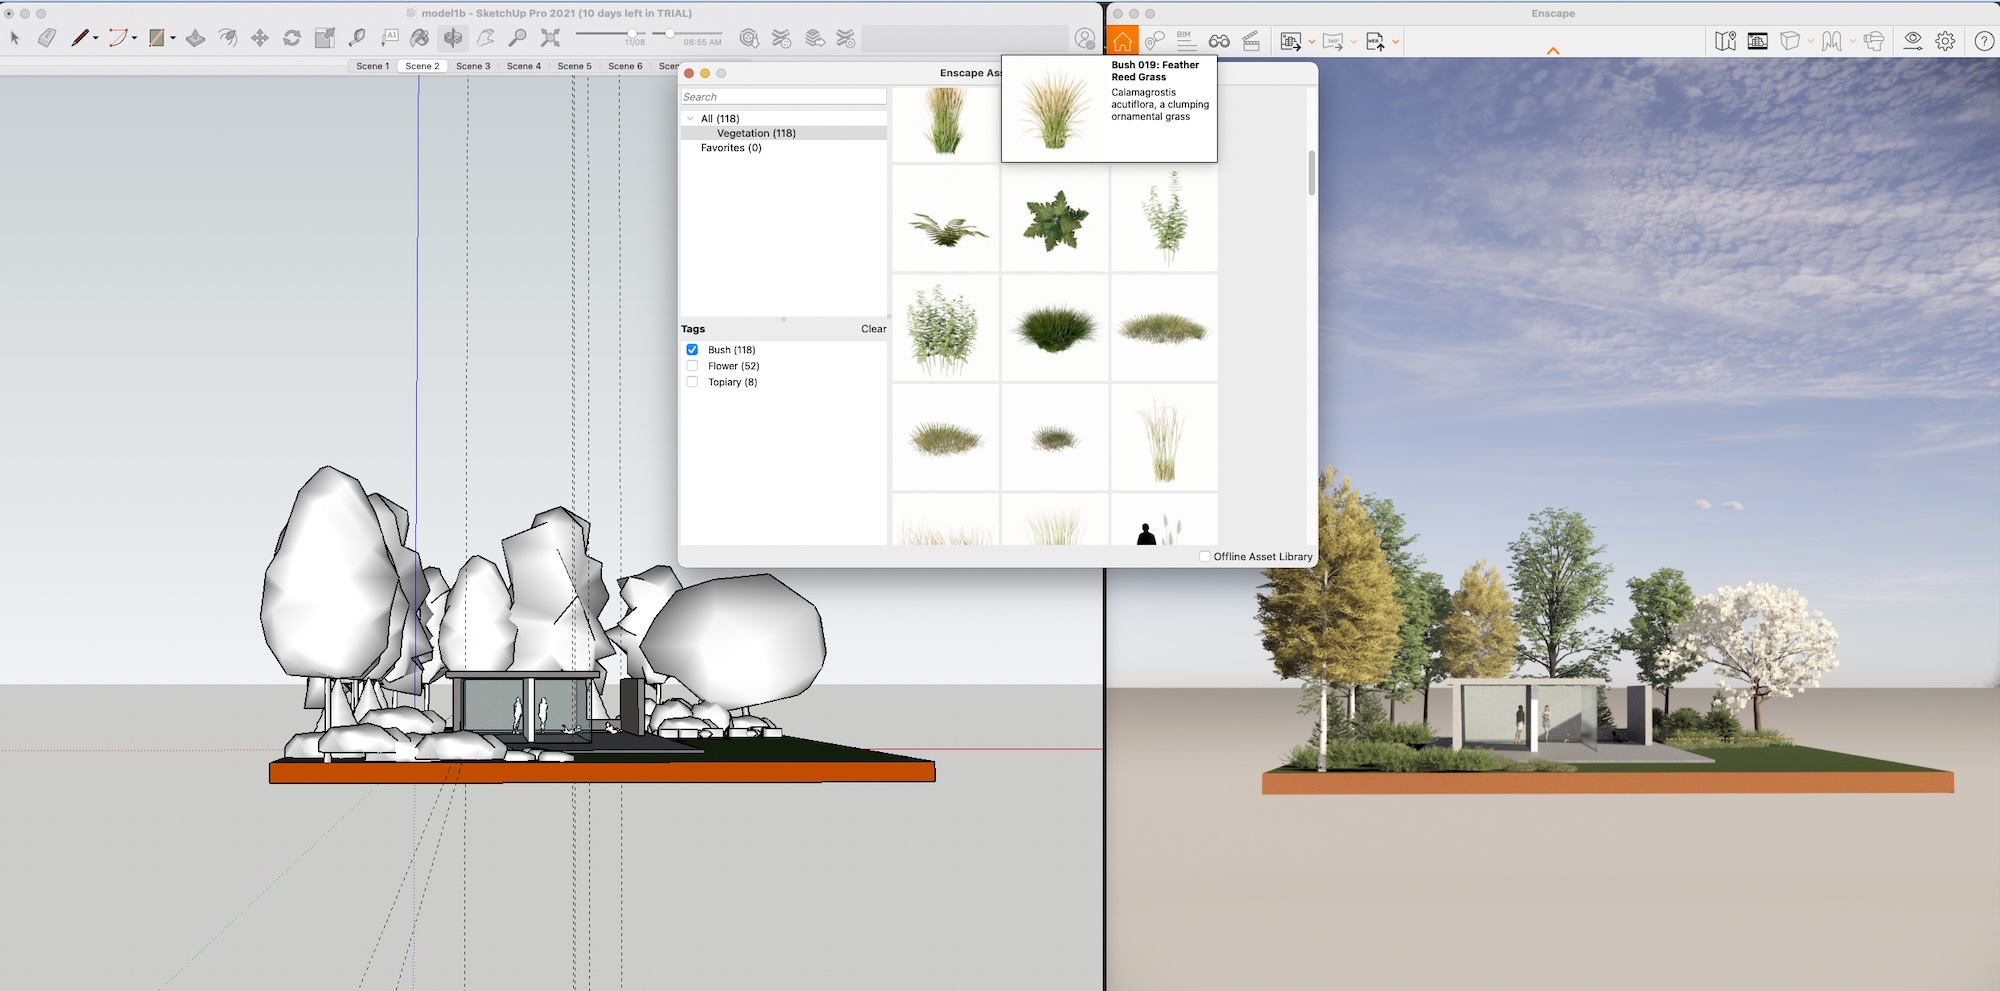
Image 14 — Vegetation options for objects in Enscape are simple to find, discover, and apply to your rendering scenes. They even have seasonal options for autumn and spring, though they could use slightly more items in each season set. Notice how trees look in the SketchUp window on left versus the Enscape rendering window on right.
While the Enscape Library has a lot of objects, users may already have highly populated models in the form of furniture. Architects and designers tend to need more accessories like kitchen appliances, plate ware for kitchen and dining settings, and floor and table lamps (especially high-quality designed items). High-quality items are required for high-quality architecture; in this case, Enscape has room for improvement. The Library does have a good amount of people, and that is the one area that seems very complete.
next page: Rendering Quality and Closing Comments
Rendering
Enscape is an “interactive renderer.” As you move around—whether by controls in SketchUp or controls in Enscape—the Enscape viewport renders the scene in real-time.
Once you stop moving, the visual quality of the rendered viewport optimizes. The Rendering Quality slider establishes the final image quality in the Visual Settings. The user can also set the rendering Style mode in the Visual Settings as well, including White model, Polystyrol, and Light View. (see images 15 – 17)
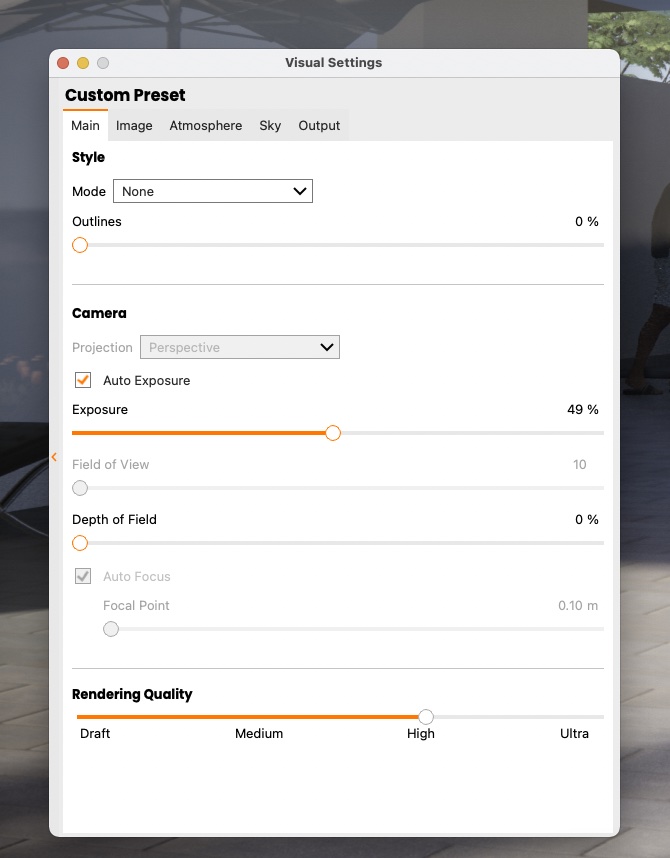
Image 15 — Enscape visual quality settings.
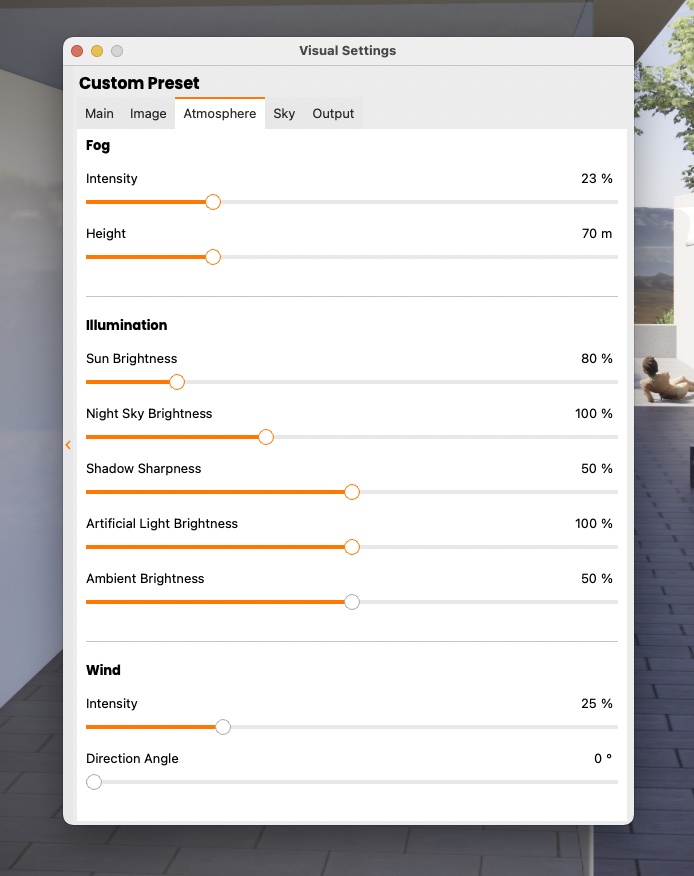
Image 16 — Atmospheric settings include fog, numerous lighting setting options, and wind.
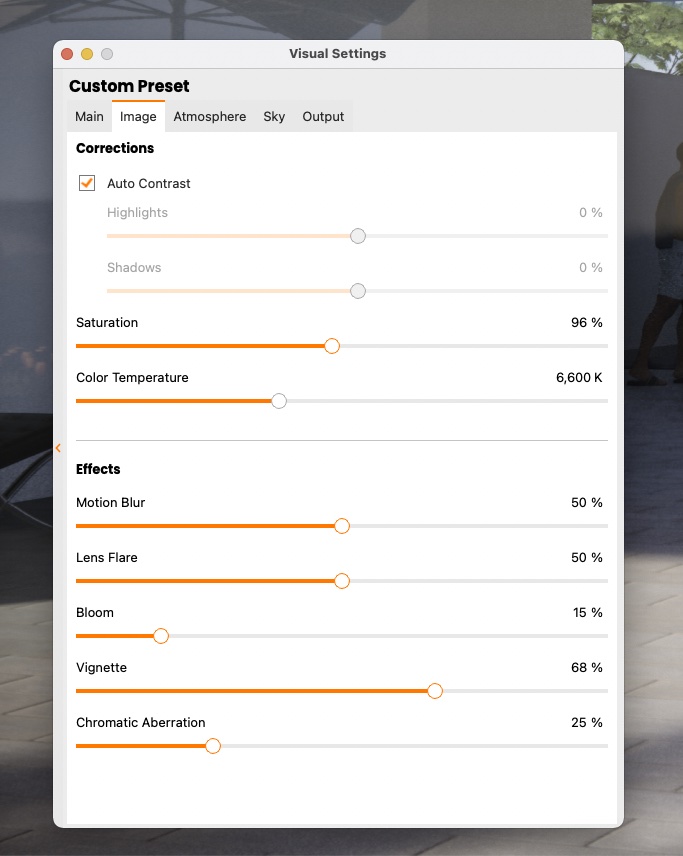
Image 17 — Image settings give the user some post-render settings controls.
Users may want to control the camera projection and force it into Two-Point perspective mode while working. You do this in the Visual Settings too. To add backgrounds to the scene, go to the Sky tab in the Visual Settings. Options include Mountains (which I used), Desert, Forest, Urban, and several others. I would like to see more options for backgrounds (doubling would be quite nice), and there is nothing for a beachfront project site or a harbor location site, for example.
However, you can load a custom HDR image under the Sky tab in Visual Settings to place your rendering exactly into its physical context if you have such an image already made. That task and file type is a more advanced topic more applicable to specialists than the typical architect Enscape is targeting. This is why I think the preset options for backgrounds should be increased to cover more possible terrain conditions.
Enscape has some sophisticated clouds and sky technology. And you can edit illumination settings for the sun, night sky, artificial light, ambient brightness, and shadow sharpness. Enscape also supports Corrections controls like color temperature, saturation, and contrasts. Then there are Effects, including motion blur, lens flare, bloom vignette, and chromatic aberration.
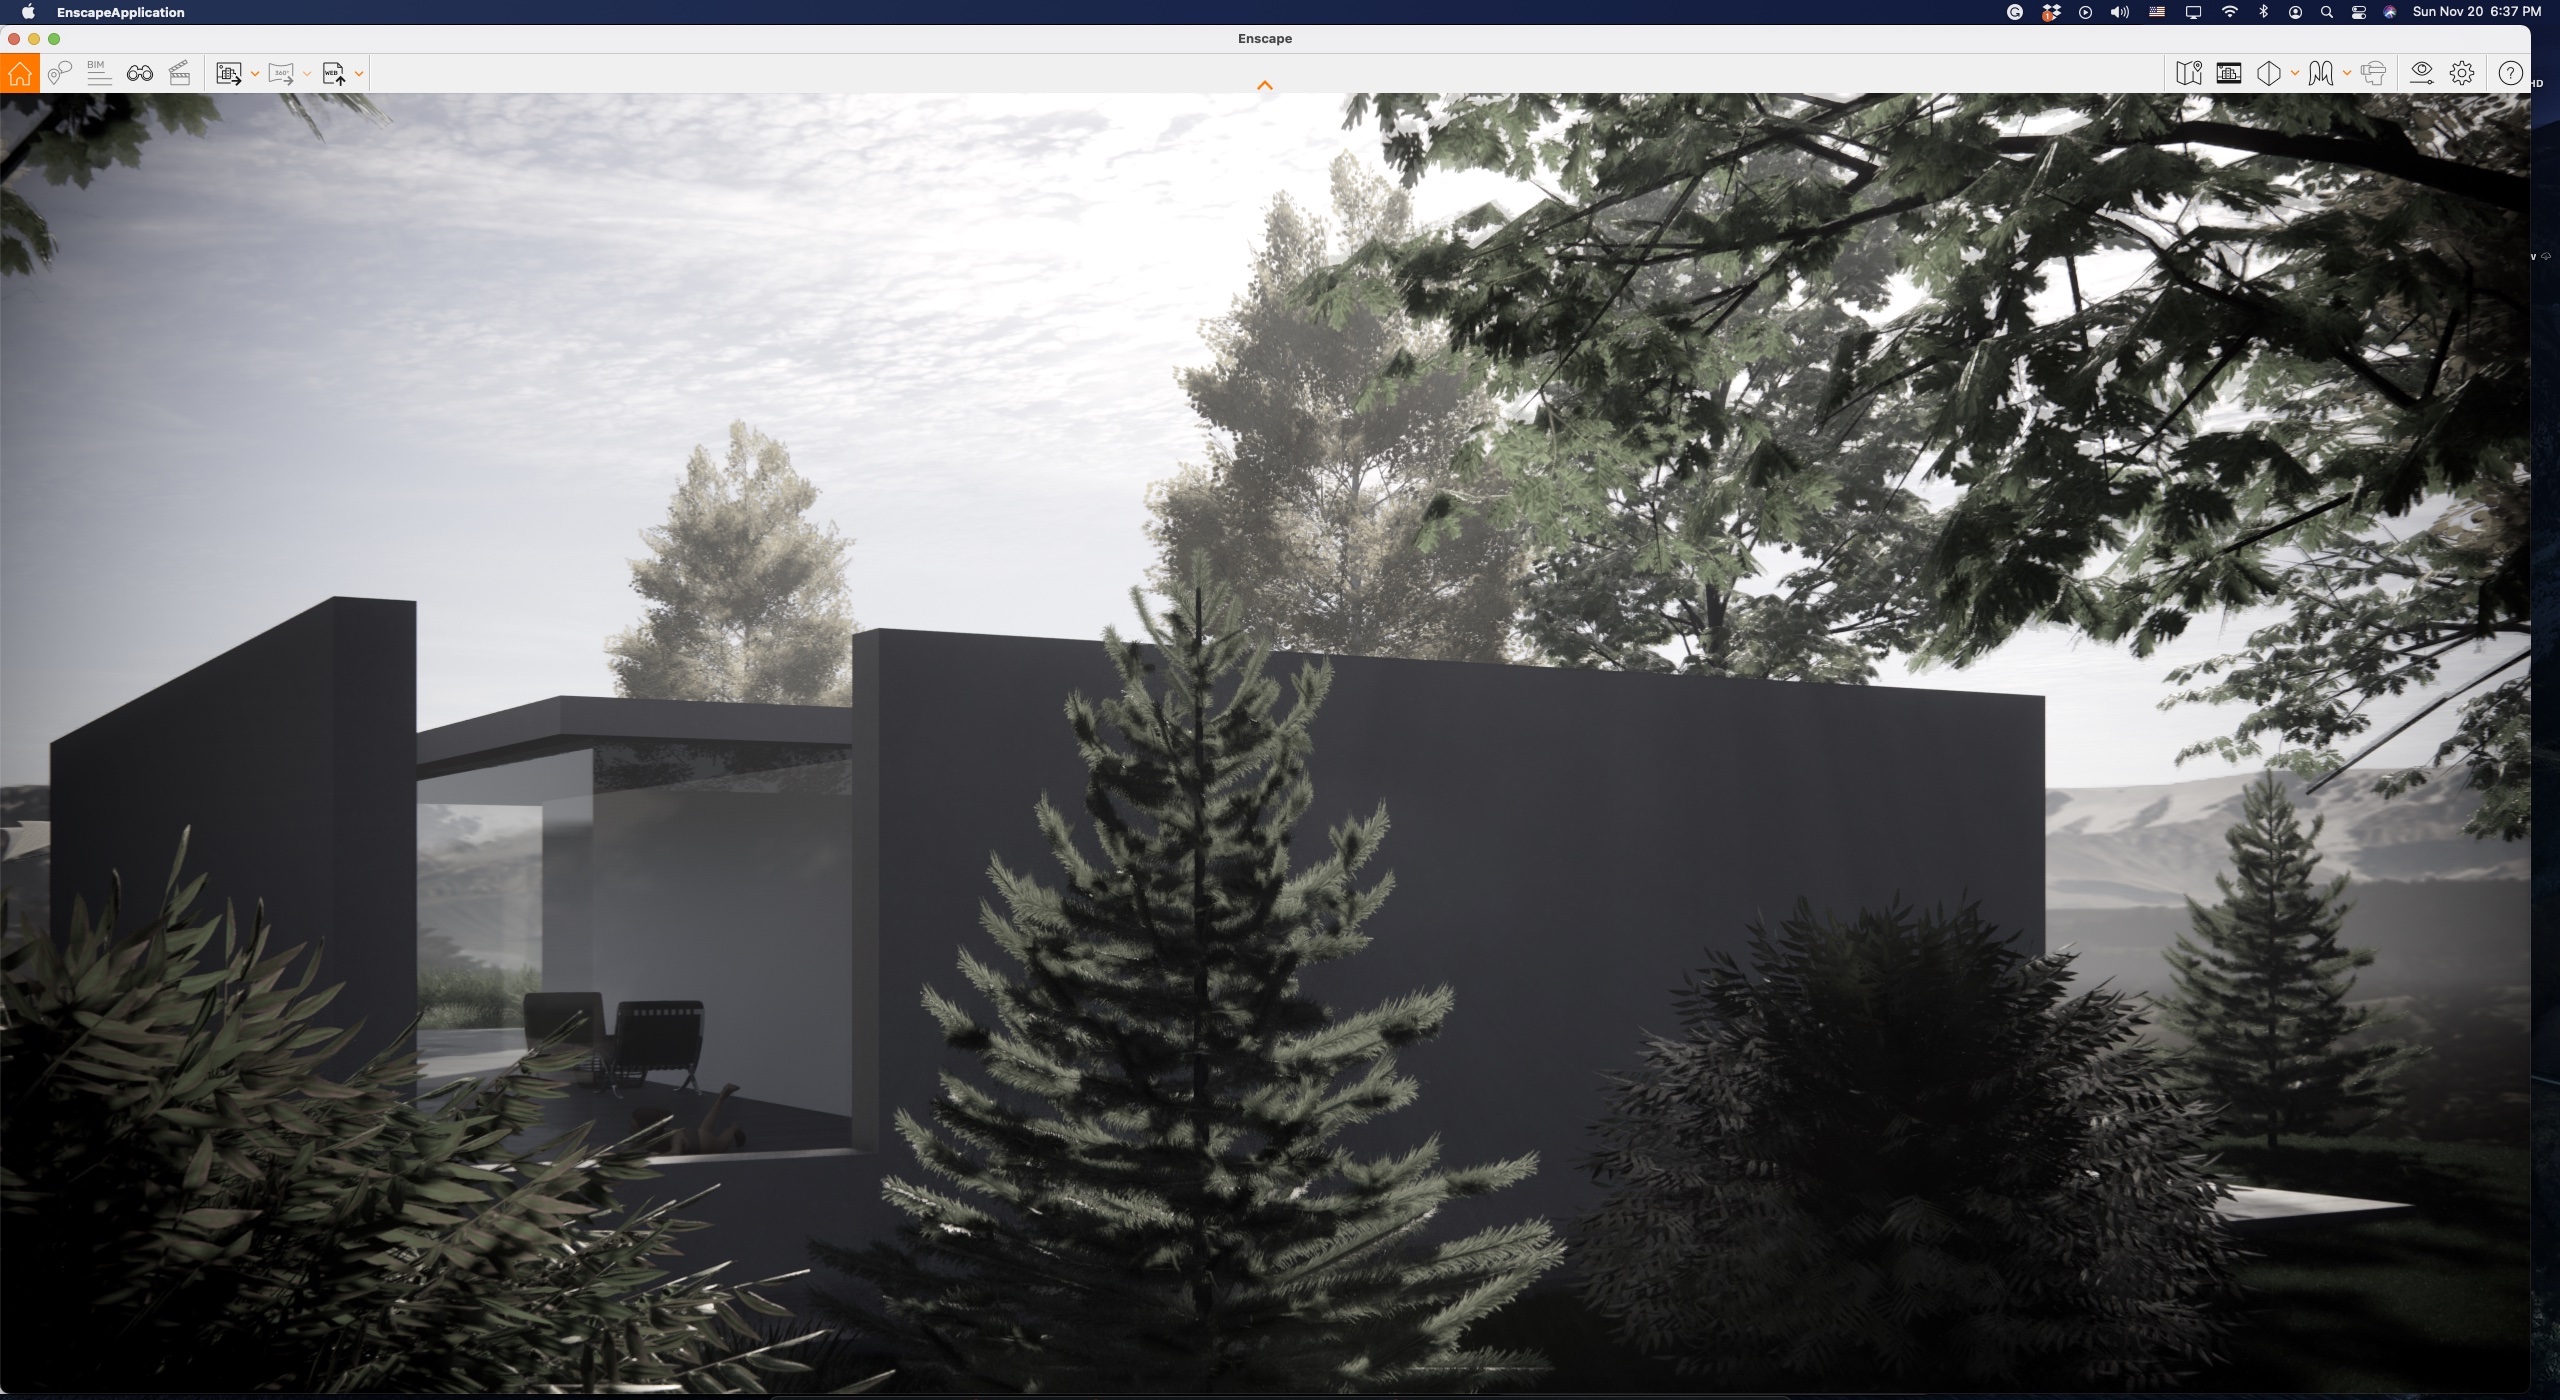
Image 18 — An example of a final render with Enscape for Mac SketchUp with post-render color temperature adjustments. The sky, trees, and lighting through the vegetation look extremely photographic, and I was very pleased with what I was able to produce so quickly. Click on the image to see a larger view.
Enscape facilitates high-quality renders of the current viewport. You can do both screenshots of single images or batch rendering. The time it takes to render a scene depends on the image Resolution and quality settings in the Visual Settings dialog and your hardware.
Enscape also supports 360-degree pano rendering. These are pretty nice, and though they take more time, they are worth a lot. Enscape can also render animations. And Enscape creates desktop and web standalone files to be shared with project stakeholders. On the Mac, you only have the choice of a web standalone. The desktop one is a (.exe) file for Windows computers. (see image 19)
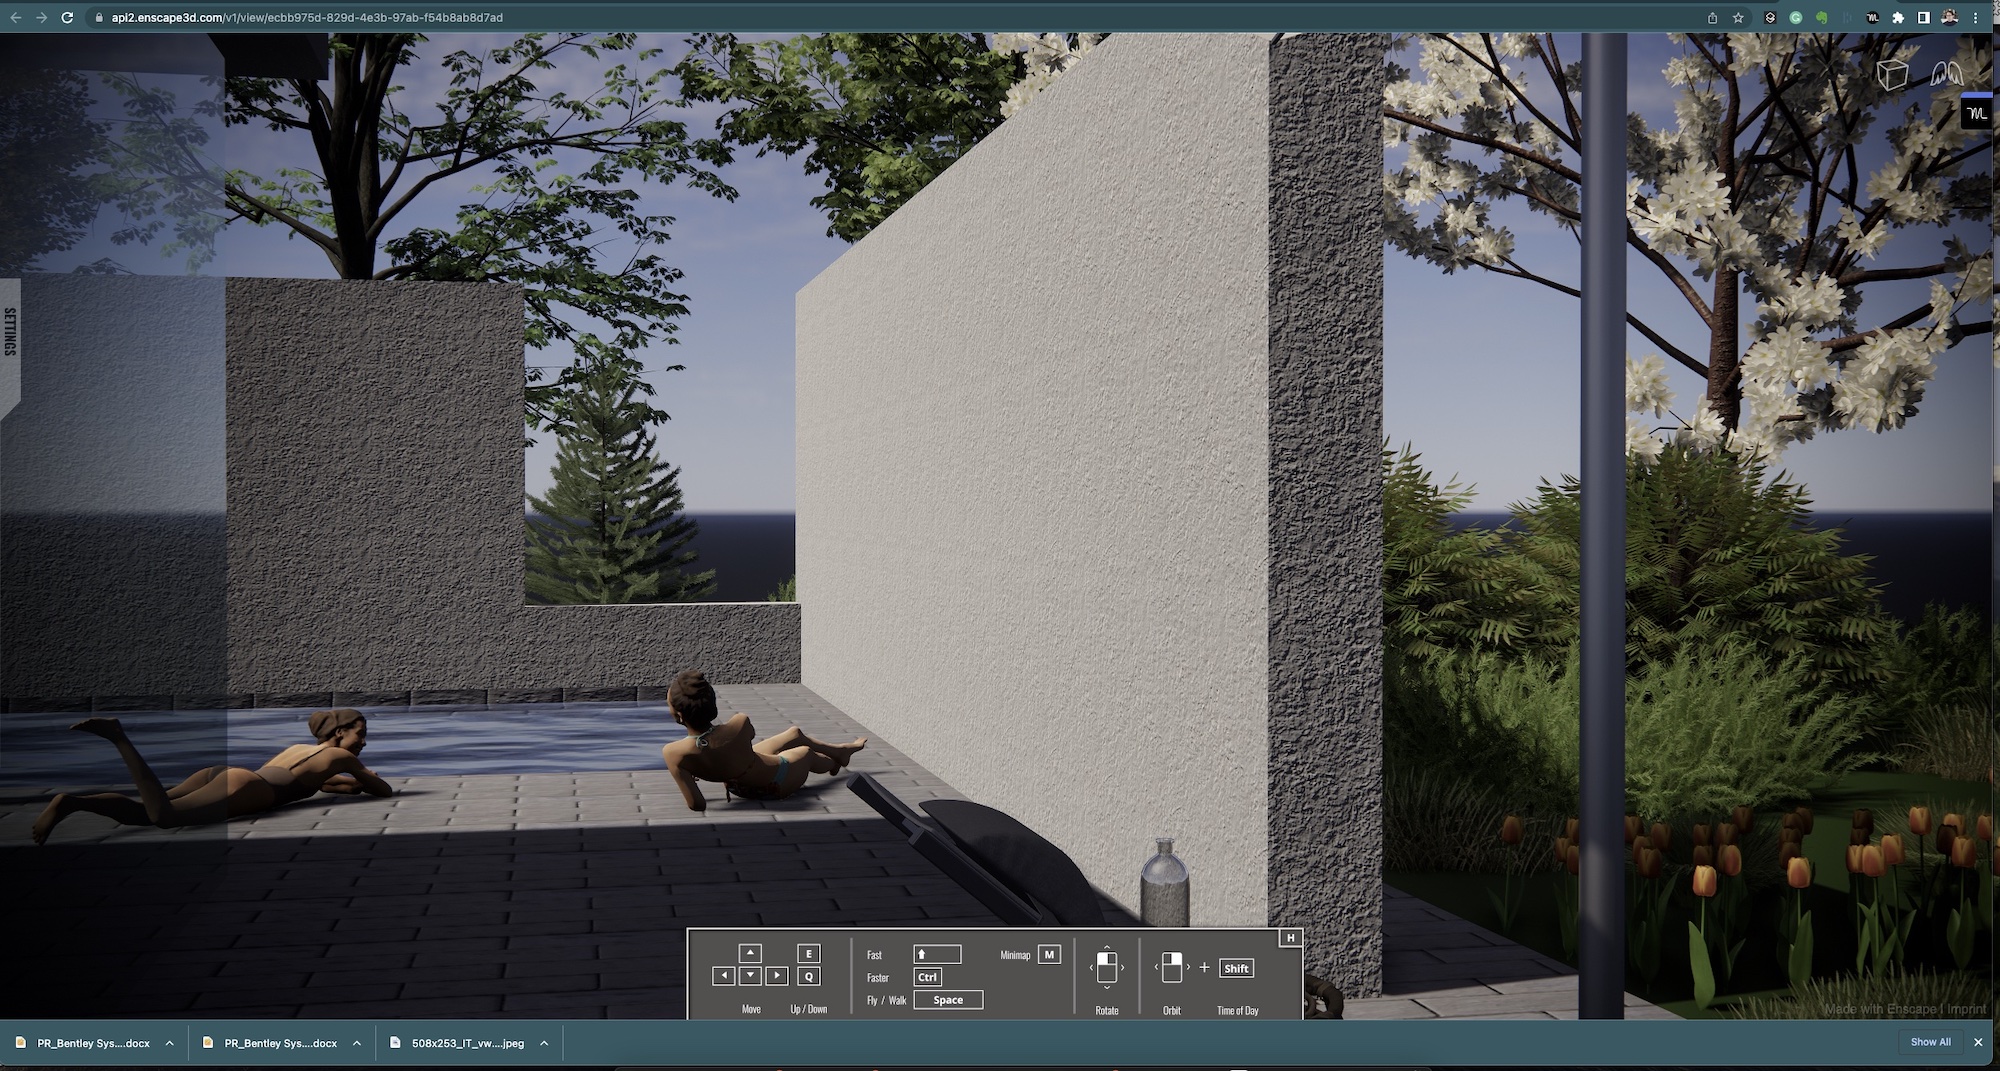
Image 19 — Enscape can create standalone renderings pushed to the cloud where clients, for example, can investigate 360-degree panos or just visual stills like this one.
A nice thing to do for your clients is to share a web standalone of a series of pano renders. This gives them the ability to explore a design. The rendering quality in the web browser-based view in the web standalone is different than Enscape itself. Plants and trees and the lighting look great, but procedural textures like grass and water are not truly supported, so these items get flatter. (see image 19). The grass is “blade-less” and just a green color. However, Enscape’s cloud and skies look quite good in the standalone render apps.
Closing Comments
When we were asked to review Enscape, the German software company asked us to focus on the Mac version and specifically test it on Apple Silicon. So we did. All of the work you see in this review was executed on an M1-chip-based Mac mini with 16GB of integrated memory on the Apple-designed ARM architecture SOC (system on a chip).
We also ran our review under macOS Big Sur (11.6.5), though Enscape says it is not officially supported. We encountered no real issues, and the performance of rendering our little SketchUp Mies-ian pool pavilion—created quickly just for this review—was very acceptable. Things were quite snappy! We can only imagine how fast Enscape would run on the latest M2-based Macs or the upcoming Mac Pro with Apple Silicon. In general, this model and the scenes created were hardly vast. So we can’t truly speak to the performance of Enscape on the Mac with larger models and scenes. That will be a follow-up report we will get to in the months ahead. What we can say for certain is that Enscape for Mac SketchUp ran smoothly and quickly on our Apple Silicon Mac Mini.
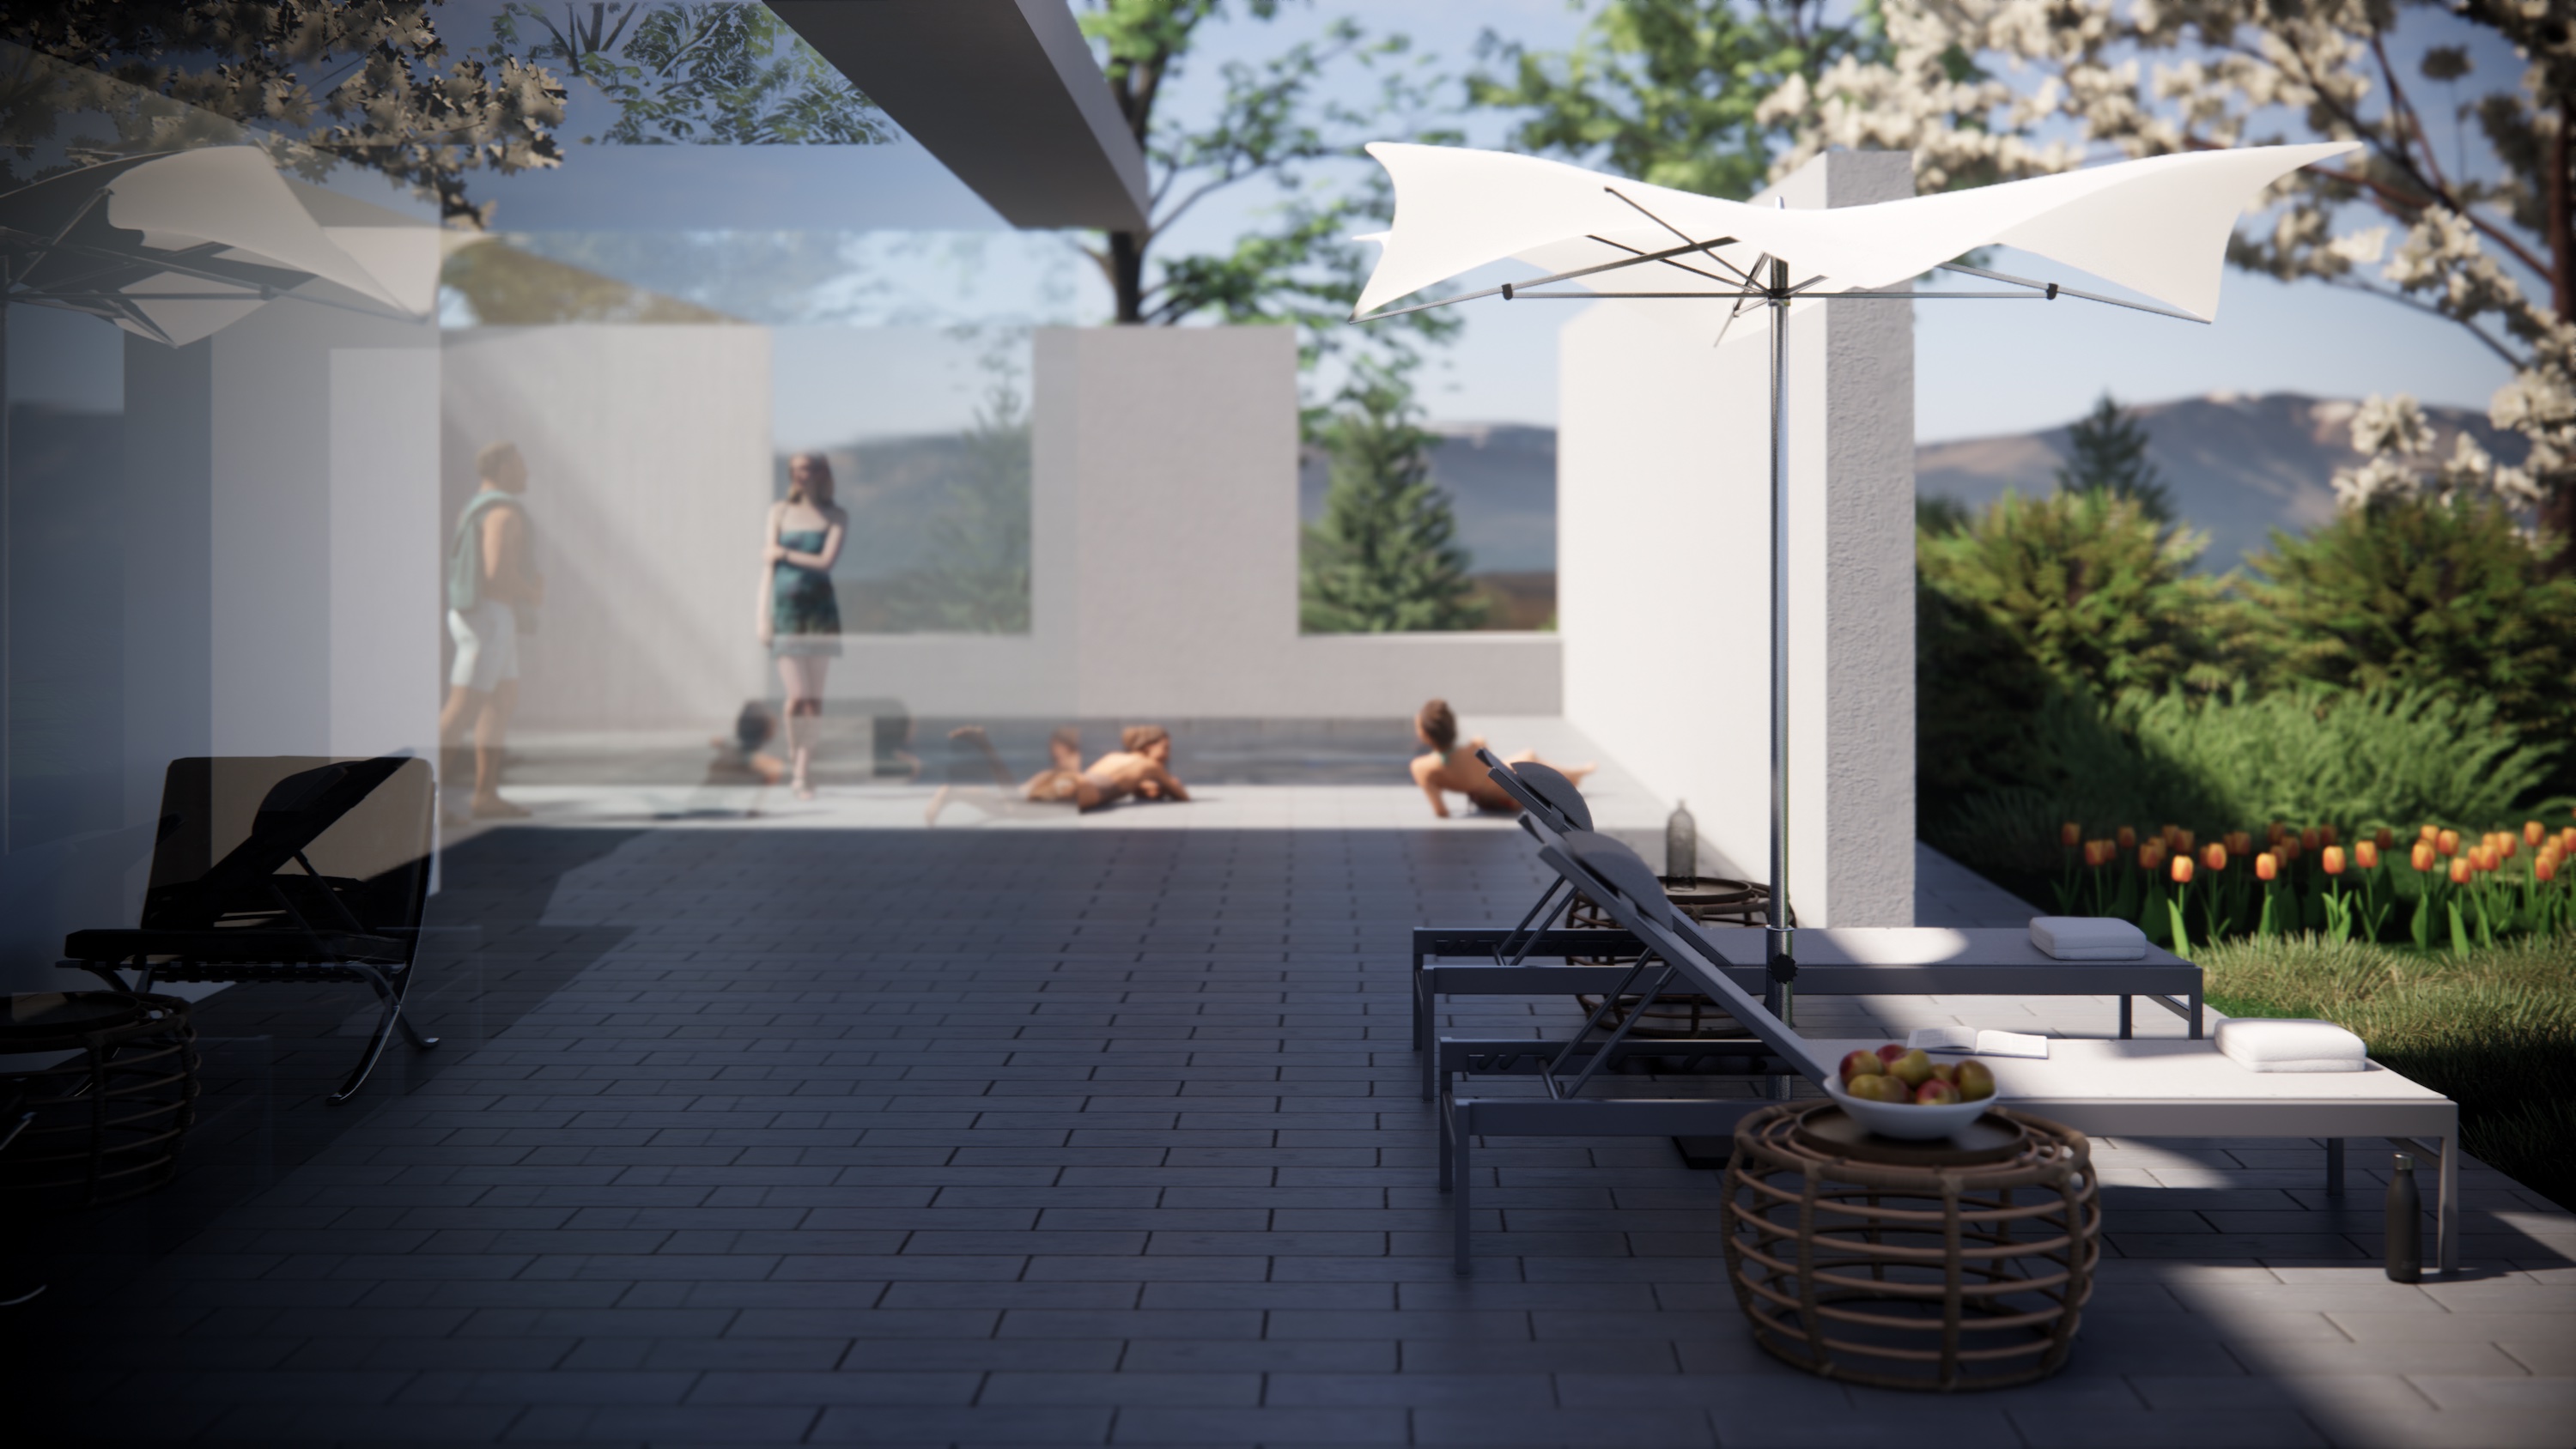
Image 20 — Enscape’s depth of field of view feature is shown in this image. The lounging chairs are in sharp focus, and the elements beyond are blurred out. The glass plane on the pavilion reflects everything to its right, so bear that in mind when viewing this image. Mies’ chairs are on the inside on the left.
There are a few minor points of criticism with Enscape for Mac. Architects doing a wide variety of work will surely bring in their own models for furniture, especially manufacturer models. What architects need are things to accessorize their scenes, and they need high-quality items. This isn’t about the quality of the objects as 3D objects but rather the design and brand-name quality of the objects.
I was very pleased with the vegetation objects in the Library. Still, I thought there needed to be more coniferous, particularly full-bodied conifers that are taller than a couple of Christmas tree options. It would also be nice to see more autumn variety in terms of color. If you wanted to create a New England scene in the fall, it might be a bit more challenging than you would like, given what is in the library today. I am sure these small issues will all be improved in the near future.
For design study models, it would be nice if Enscape added a balsa wood rendering option to complement the white model option. I know that users individually do this, so it would be a big time saver not to have to apply such a texture itself but have it automated like the white-model function.
Overall, I laud this software for its efficiency in giving architects—as opposed to specialist rendering pros—a wonderfully simple and effective visualization tool. The side-by-side view approach within design applications—because it is a plugin—means that visualization becomes a part of the design process and gives the architect a level of confirmation that they usually must wait for further downstream in the design phase. It means architects can get more connected to the reality of their design decisions earlier in the design process while they are still modeling space and form. From this perspective, Enscape for Mac SketchUp is an outstanding software that architects should consider adding to their arsenal of tools. Now we just look forward to continued improvements and more Mac versions for leading BIM solutions and Rhino if those are in the works.
Pros: Enscape for Mac SketchUp was pleasing and fun to use. We only watched a few Enscape-created videos to get started, though there is a good Knowledge Base here specifically for this version on the Mac. Enscape has an appealing visual quality with a good set of customizations; it can rapidly create white models and light view models. It has good navigation controls, excellent Help guides, a standalone render option, and a solid objects library that will surely get better over time. As a plugin for SketchUp on the Mac, Enscape offers a level of visual intention feedback that is hard to beat, offering designers and architects higher certainty of design intent, and it delivers this for a very fair price.
Cons: Feature parity with its Windows version will take more time and will take Apple to support certain things like VR more. The web standalone solution drops out the visual qualities of water and grass, but the skies remain excellent. When Synchronize Views is toggled “on,” and you are working in the Enscape window trying to tune up a view for rendering, you may get stuck having to go back and break synchronization so you can set your view to a two-point perspective. While we understand why it happens, that doesn’t change the workflow fix. A method to reach those Enscape buttons when you are inside the Enscape window may be a solution, or perhaps not?
Recommendations: Enscape on Mac for Sketchup is stable and fast, including on Apple Silicon Macs. For SketchUp users who have not yet tried this rendering plugin, we highly recommend it given the software’s visual qualities, flexible output options, and overall pleasant user experience (UX) a big thumbs up!
Costs: 514 USD MSRP for a fixed seat license per year (subscription)
![]()
