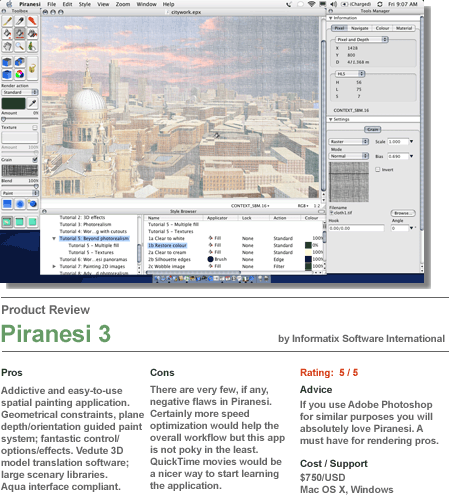
Piranesi 3 by
Informatix Software International, in the United Kingdom,
is the latest edition of one the most exciting applications
to hit the AEC (architecture/engineering/construction) software
market in quite some time. At just the point where architects—and
many in the general population—were beginning to realize
one day soon computers would render 3d scenes indistinguishable
from reality, along comes a program that produces imagery
as dreamy and impressionistic as a French country scene in
a Monet painting.
What has certainly surprised some—including
this author—is that such a movement back towards the
days of beautiful hand drawings would be facilitated by the
very machine that helped aid their demise in the first place.
This is especially true in the world of architecture where
students in colleges around the world have learned to play
digital putty makers with programs such as formZ, Maya and
Softimage. No doubt, such high-end tools have a place in the
arsenal, but far too often their output lacks the ability
to project a mood or sensibility about a designer's ambitions
with a particular project. Instead such tools often produce
uniform looks more akin to science-fiction movies such as
Tron and The Matrix. Piranesi is different;
it harks back to the days of traditional hand drawing skills.
Piranesi 3 - Learning the Program and the
Interface
One of the nice things that seems to come out
of new or young software developers is that they put great
effort into explaining how to learn and use their software.
Nowhere is this more important than in learning advanced visualization
and modeling applications like 3D and rendering. Informatix
does a good job of this by employing a solid .Html-based help
and tutorial system.
The program's interface itself is simple and
complies with Apple's
Mac OS X Aqua interface guidelines. Piranesi 3 has a healthy
amount of detailed controls but all of this is managed within
an interface that employs an excellent use of simplicity,
differentiation, and depth. Specifically, regions of the interface
number no more than four distinct areas, counting the drawing
area. Within the main Tools Manager—essentially the name
Informatix calls the properties or inspector like palette
controls—there are three major areas: Information, Settings,
and Cutout Manager. Each sub-area itself operates like its
own regional control center, just like the Mac OS X's individual
control preference panels. A menu bar is associated with each
item (Information, Settings, and Cutout Manger) and under
each are palette controls settings that consist of fields,
drop-down menus, sliders and so on. Within a fairly short
amount time a new user will adapt to the excellent use of
depth in the interface to begin exploring the program's diverse
set of image controls.
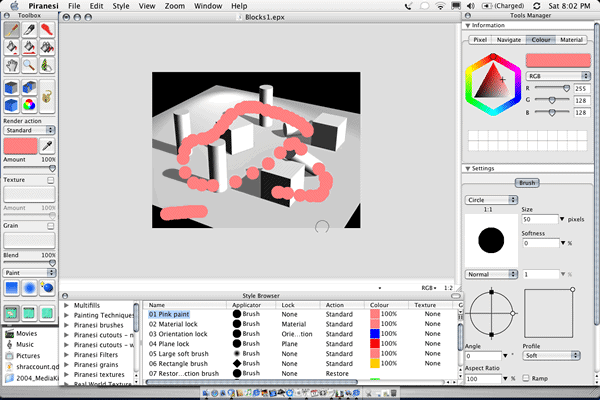
Painting
You begin painting in Piranesi by bringing in
an EPX (EPix) Piranesi native file format image (more on that
later). In the images directly below (see
001 - 002) you can see a basic tutorial image file
consisting of some geometric primitives. The early part of
the tutorial has you working on these basic items. The first
question you might have about Piranesi is, "how do you
actually paint with accuracy?" It's a very good question
because anyone who has used Adobe Photoshop to do painting
on architectural renderings knows that there is work involved
in controlling what you paint. With Piranesi the EPX file
format stores more information than a typical bitmap file.
There is both depth information and geometrical information
about the objects themselves. The program uses a series of
intelligent constraints or locks (shown on the left hand side
in the Toolbox palette) to help you paint just specific objects,
planes, materials, or items with a particular color.
Without these locks on (and you can apply them
in combinations to do different things with the constraining
system) you are free to paint over the image just as I did
with a brush with pink paint (image
001). (click on images for larger views). Naturally
you can zoom into the image (just like in Photoshop) and pick
a smaller diameter brush to be more accurate with your painting
if you like, but the real power of this application lies in
its ability to constrain painting actions to specific elements
of the scene.
Similar to programs such as Adobe Photoshop,
Piranesi includes numerous brush type settings. You can paint
with a circular brush, determine its size, softness and even
angle. An aspect ratio setting allows you to convert the brush's
circular shape into an elliptical-like shaped brush. Additionally,
Piranesi can take advantage of pressure-sensitive input devices
like Walcom tablets. One of the more special things about
Piranesi is the use of 3D brushes. A 3D circle or rectangular
brush tracks surfaces in 3D space as you paint.
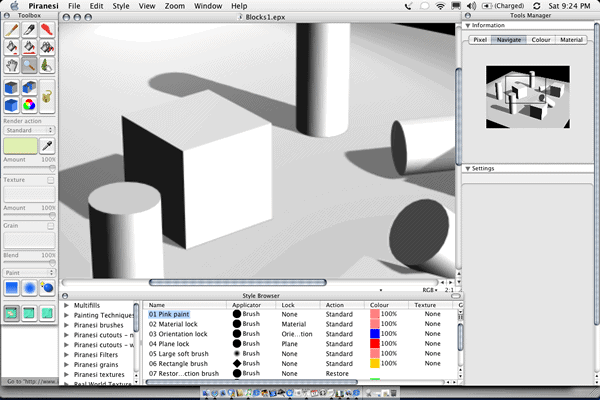
Piranesi goes beyond programs like Adobe Photoshop
because it saves more intelligent information useful to painting
in 3D space. In addition to the regular bitmap information
like RGB values saved in typical "graphics" painting programs,
Piranesi saves pixel depth information and data about the
3D objects represented in the image scene. This distuingishing
feature is important. Plane and depth data is critical to
the application of textures such a stone, brick, or wood such
that they scale correctly to the image and conform to the
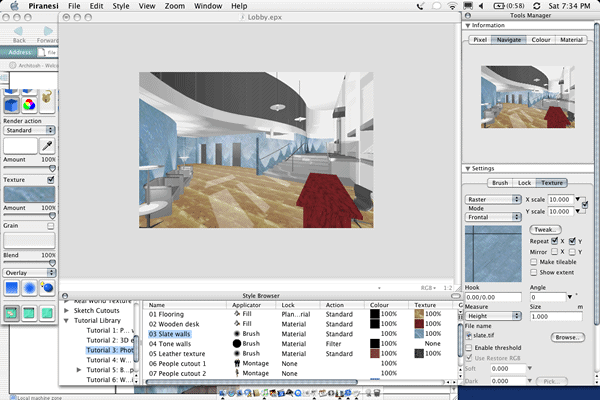
rules of perspective. In the images below (see
003-004) a wood flooring texture is applied much like
it would be in any typical 3D modeling/rendering program,
complete with the ability to rotate and orient the direction
of the wood. It is important to point out that the wood is
being applied to a 2D image file that represents 3D space,
unlike the application of a wood floor texture to a floor
in a true 3D modeling application.
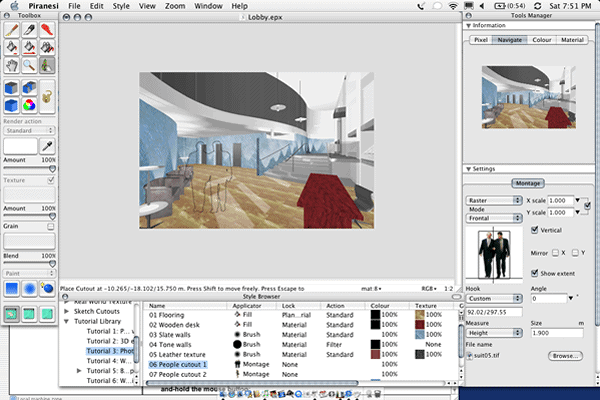
Piranesi's file format is quite amazing. For
example people and trees automatically scale as you slide
them over the image, based on the pixel information underneath
the cursor. Moreover, when people or trees are placed in an
image they may appear behind or in front of elements in the
scene, again depending on their location. The program will
automatically crop the people's bodies correctly if they are
behind elements in the scene.
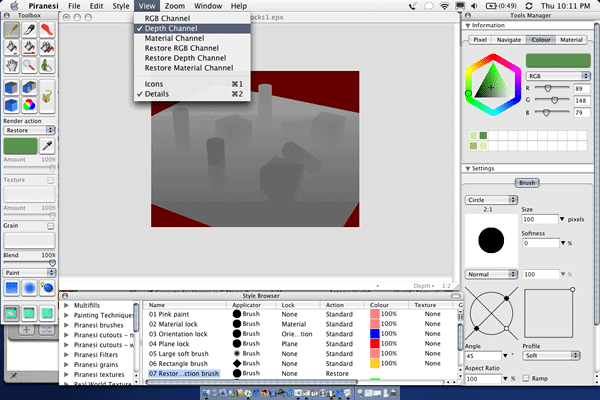
This intelligent scaling feature of Piranesi
is due to the depth channel. There are several channels stored
with the EPX file format. In addition to an RGB channel there
includes a Depth Channel (see 005)
as well as a Material Channel. A Pixel tab on the Tools Manager
allows you to visually see the x, y, and D dimensions of the
pixels and their associated depth in the scene. D is the associated
depth of that pixel in the scene.
The Material Channel information serves as a
way of defining different elements in the scene, such as walls,
ceilings, particular furniture items, etc. When you view the
image by the Materials Channel elements in the scene are rendered
in bright distinguishing colors.
Next
Page: Piranesi 3 - Part 2
| 1 | 2
|

|