Continued from page 1
Materials
The advantage of third-party rendering programs is that you get much more control over material settings than SketchUp’s standard Color, Opacity and Bitmap Texture. With TurboSketch Studio installed these three attributes are still controlled from within SketchUp — there’s no point duplicating the functionality. TurboSketch Studio itself adds Finish and Bumpiness.
Bumpiness uses the bitmap material supplied on a surface as a bump map — there’s no need for you to supply another gray-scale version for the purpose. The mapping is also set exactly one-to-one with the texture map, which, for architectural models is what you want it to be 99.9% of the time. You can then control the amplitude of the bump, and you can also reverse its direction — essential for getting brick courses and paving joints looking right.
One problem that we noticed was that materials sometimes came out ‘overtiled’ — their size reduced and their repeat greatly multiplied. However, it transpired that this can be a problem when materials are applied at the group level in SketchUp, instead of at the surface level. Simply exploding the group (and then immediately re-grouping it, if necessary) sorts out the problem. We’ve noticed that several other programs also have this problem with SketchUp groups and textures.(see images 05-06)
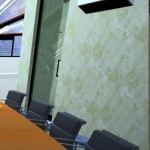
06 – The image at right shows the correct materials tiling after exploding and regrouping the geometry.
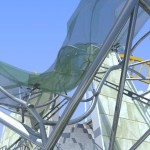
07 – The inability to set a refraction index for glass means that items like this canopy can come out looking a bit, well…wrong.
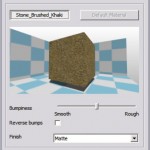
08 – TurboSketch Studio Mac’s Material dialog is distinctly underwhelming when compared to its Windows cousin.
Finishes alter the surface ‘look’ of your material, and following from their ease-of-use philosophy, TurboSketch Studio contains presets that are easily applied to the model. These presets are Matte, Plastic, Varnished, Polished, Mirror, Metal (dull), Metal (polished), Glass, Glow and Water. While the ease-of-use approach may be okay for some, other users may feel the need for a little more control here — there’s no ability to set Refractive index for glass, for instance. (see image 07). Also, the lack of an Anisotropic shader (for accurately rendering surfaces like brushed steel and aluminum) seems like a bit of an omission.
Another problem presents itself in the dialog box: no material preview. Unlike the Windows version, which has a realtime-updated material preview, TurboSketch Studio Mac users will have to fly blind. (see images 08-09). This is an omission that should be addressed as soon as possible.
Another thing in the Materials dialog that is initially confusing are the two buttons for assigning material finishes, each button bearing the name of the material you’re currently working with.
It needed a troll around the forum (there’s nothing in the manual) before we were able to ascertain what these meant. They actually refer to the frontside and backside faces of SketchUp materials (the ‘khaki/purple distinction’). Since they’re not labeled, you’d best set them both to be sure of getting the result you want. The eagle-eyed amongst you may also have spotted that the ‘OK’ and ‘Cancel’ buttons are the wrong way round in the Mac version, which caused a lot of hassle in the beginning, with us instinctively clicking on the ‘Cancel’ button, then wondering why our changes weren’t applied. One further annoyance: if you use the ‘Brightness’ and ‘Contrast’ sliders to adjust your image, but then change your mind and hit the ‘Cancel’ button, your changes will be accepted anyway.
SketchUp’s single light source (the Sun) is a real drawback when it comes to getting any feel or atmosphere into your renders, so the provision for various light types in TurboSketch Studio should prove to be a real boon for users. The way that TurboSketch Studio handles lights is rather left-field and quite clever. Basically, you’re provided with seven types of light sources as components in SketchUp’s Component browser. These are Ceiling light, Exterior light (not the Sun), Point light, Spot light and three types of Wall light fittings. These are just simple SketchUp geometry shapes, so their placement within a model is extremely straightforward. Since they’re geometry, they’ll also show up in any render — not a problem for the light-fitting types, but you’ll also get visible point lights. However, you can scale these down to invisibility without affecting their light-casting properties. (see images 10-11).
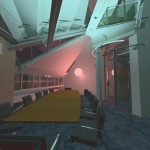
10 – Because TurboSketch lights are supplied as geometry in the form of SketchUp components, they will be visible in any render. The orb here represents TurboSketch
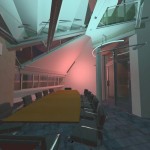
11 – However, scaling the size of the light component has no effect on the type of light that it casts, allowing the user to hide the light sources.
As mentioned, the lights supplied are components, and conversely, any geometry defined as a component can be turned into light source. So you could have a spiral staircase as a light source if you chose to.
TurboSketch Studio uses SketchUp’s sun as its main light source, taking its position from the program. There is an option to override this within TurboSketch Studio, but you have to enter the Sun angle and elevation instead of geographical location and date and time, which seems a bit like hard work. You can also set lighting conditions for the sky, so you get Clear, Hazy Overcast, cloudy for both daylight and twilight, and nighttime full moon, half moon and overcast. You can also supply any image to be used as a backdrop to your scene. But these images cannot serve as light sources themselves.
You’ll notice something, however, when you add an internal light: the sun goes out. This is because IMSI/Design reckons that natural light tends to swamp interior lighting. They have a point — although this can be a little confusing at first. It is possible to force natural lighting on at the same time as interior lighting from the TurboSketch Lighting controls, but you then have to set the intensities of the internal lights way up high — in the millions of lumens ranges, to overcome this. We found that this was a little hit-and-miss in practice — wouldn’t it be easier to simply reduce the contribution of the Sky Component?
Conclusion and Recommendations
Overall, TurboSketch Studio largely delivers on its promise of one-click rendering. The are are some interface glitches that need smoothing out — a persistent tendency of the render window to resize itself to a small letterbox format, for example — the dialogs need a lot more attention, and we’d like to see IMSI/Design get the UK release sorted out (just release the plug-in on its own, maybe?). However, we think IMSI/Design have defined the market for this product rather well. It’s the only product on the Mac platform that does what it does: one-click rendering from within SketchUp without the hassle of transporting your files between two different environments, and its attractive price certainly merits it serious consideration. —- TIM DANAHER, Associate Editor
Pros: Only plugin renderer for SketchUp on the Mac; beguiling shading properties using Presentation render; no import/export hassles; automatic bump maps based on SketchUp textures; Mac Universal support and good price.
Cons: No materials preview; badly implemented dialogs; render window can spontaneously resize; no multiprocessor support and no animation capabilities.
Advice: Clearly delivers on its “one-click” rendering promises and offers Mac SketchUp users the only game in town for photo-realistic rendering results — which are quite excellent! This product comes with SketchUp 6.
Cost: $99USD / Mac OS X Universal Binary Support.



Reader Comments
Comments for this story are closed